This chapter describes how to configure the following components of ESP:
Events
Actions
Performance monitoring
System monitoring
Events are conditions that ESP monitors. ESP includes many default events, and you can add custom events. Example events include panics, high processor utilizations, and nonmaskable interrupts (NMI).
Events are organized into event classes, which enables you to quickly view and update similar events. Example event classes include availability, system configuration, and performance.
| Note: Chapter 10, “Default Event Classes and Types,” contains lists of all event classes and event types that ESP includes by default. |
To manage events on your system, use ESP to perform the following activities:
Manage event profiles
View existing event classes and events
Add events
Update existing events
Update multiple events at the same time (batch update)
Delete events
Subscribe to events on other system (system group management mode only)
Event profiles provide an easy way to control which events are being monitored on your system. You can use event profiles to quickly load events that pertain to your system configuration and unload events that do not.
Event profiles are located in the /var/esp/init/eventprofiles directory. If you manually edit an event profile, you must save it with a .esp extension in this directory.
| Note: In the following subsections, the term “ESP event list” refers to the events that are currently loaded in ESP on your system. |
Perform the following procedure to use the Web-based interface to use event profiles:
Click on the Configuration button.
Click on the Events button.
Click on the Load Profile button.

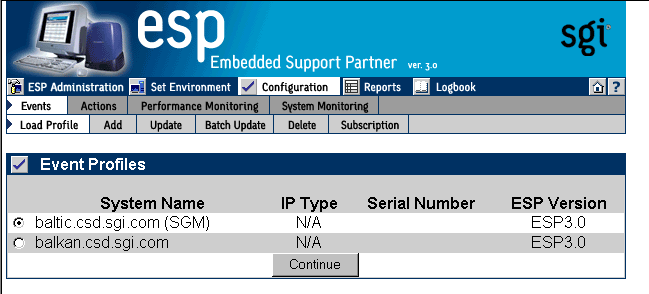
Note: If the system is an SGM server, the interface displays a list of clients. (Refer to Figure 5-1.) Click on the client that you want to use, and click on the Continue button.) The interface displays the Event Profile window. (Refer to Figure 5-2.)
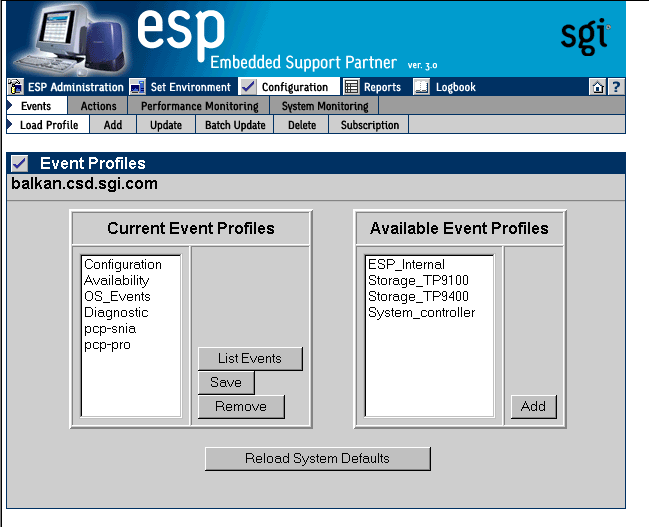
Use this window as follows:
To list the events that are contained in a profile, click on the profile in the Current Event Profile list, and then click on the List Events button.
To remove a set of events from the current ESP event list, click on the profile in the Current Event Profile list, and then click on the Remove button.
To save the current ESP event list in an event profile, click on a profile name, and then click on the Save button.
To refresh the list of profiles (from the SGM client), click on the Refresh All Profiles button.
To add a set of events from an event profile file to the ESP event list, click on the profile in the Available Event Profiles list, and then click on the Add button.
Note: If the selected system is an SGM client, you should click on one of the radio buttons before you click on the Add button. Click on the radio button next to Subscribe to subscribe the events in the profile to the SGM server when ESP loads the event profile, or click on the radio button next to Do Not Subscribe to load the event profile without subscribing the events to the SGM server. To reload the system defaults, click on the Reload System Defaults button.
You can use the espconfig command to manage event profiles:
Use the following command syntax to list the event profiles that are available on a system and determine which profiles are currently loaded:
/usr/sbin/espconfig -list eventprofile [eventprofile name]
  [-sgmclient <client alias> | -sysid <system Id>]
If you indicate a specific event profile, ESP lists only information about that event profile.
Use the following command syntax to clear the current event list and assigned actions and to install the event profile that is stored in a file:
/usr/sbin/espconfig -load eventprofile
  <profile name>+|allprofiles [-defaults] [-dontsubscribe]
  [-sgmclient <client alias> | -sysid <system Id>]
Use the following command syntax to compare a file of event profile data with the events that are currently installed in ESP and to insert any events in the file that are not already installed:
/usr/sbin/espconfig -add eventprofile
  <profile name>+|allprofiles [-defaults] [-dontsubscribe]
  [-sgmclient <client alias> | -sysid <system Id>]
Use the following command to compare the events that are currently loaded in ESP with an event profile data file and update the events in ESP that are different in the event profile data file:
/usr/sbin/espconfig -merge eventprofile
  <profile name>+|allprofiles [-defaults] [-dontsubscribe]
  [-sgmclient <client alias> | -sysid <system Id>]
Note: If the event is not already in the ESP event list, the event is added to the list with the parameters defined for the event. Use the following command syntax to remove all events that are in the specified event profile data file from the ESP event list:
/usr/sbin/espconfig -drop eventprofile
  <eventprofile name>+|allprofiles
  [-sgmclient <client alias> | -sysid <system Id>]
Note: If the event being dropped is part of another event profile, the event is not dropped. Use the following command syntax to unload an event profile:
/usr/sbin/espconfig -unload eventprofile
  <eventprofile name>+|allprofiles
  [-sgmclient <client alias> | -sysid <system Id>]
Use the following command syntax to save the current ESP event list and assigned actions in an event profile data file:
/usr/sbin/espconfig -save eventprofile <profile name>+|allprofiles [-defaults]
Use the following command syntax to refresh the ESP event list and assigned actions from an event profile data file:
/usr/sbin/espconfig -refresh eventprofile <profile name>+|allprofiles [-defaults]
Use the following command syntax to show event information from an event profile:
/usr/sbin/espconfig -refresh eventprofile <profile name>+
[-sgmclient <client alias> | -sysid <system Id>]
You can use the espconfig command to view all events and event classes that are available on your system.
Use the following command syntax to list the event classes that are loaded on your system.
/usr/sbin/espconfig -list evclass
The output lists the event class ID and event class description. (Refer to Chapter 10, “Default Event Classes and Types,” for a list of the default event classes.)
Use the following command syntax to view the event types that are loaded on your system:
/usr/sbin/espconfig -list evtype [-cid <class id> | -cd <class description>] [-enable | -disable] [-log | -nolog] [-sgmclient <alias>]
Use the -cid option to show events with a specific class ID value. Use the -cd option to show events with a specific description. If you do not use the -cid or -cd option, this command lists all event types. (Refer to Chapter 10, “Default Event Classes and Types,” for a list of default events.)
The following command syntax shows all information about an event:
/usr/sbin/espconfig -show evtype {-tid <type id> | -td <type description>} [-sgmclient <alias>]Use the -tid option to show events with a specific type. Use the -td option to show events with a specific description. If the type description is not unique, the command displays all matching event types.
The following example shows output from this command:
karma# espconfig -show evtype -tid 4194470
begin : eventType
             class            : 7001
             type             : 4194470  #(0x4000a6)
             classDescription : "Irix"
             typeDescription  : "unix / * CONFIG-ISSUE*"
             throttleValue    : 1
             actionFrequency  : 0
             eventEnabled     : YES
end   : eventType
You can add your own events to ESP on your system to have it monitor and register events that are specific to your system.
Perform the following procedure to use the Web-based interface to add an event:
Click on the Configuration button.
Click on the Add button.
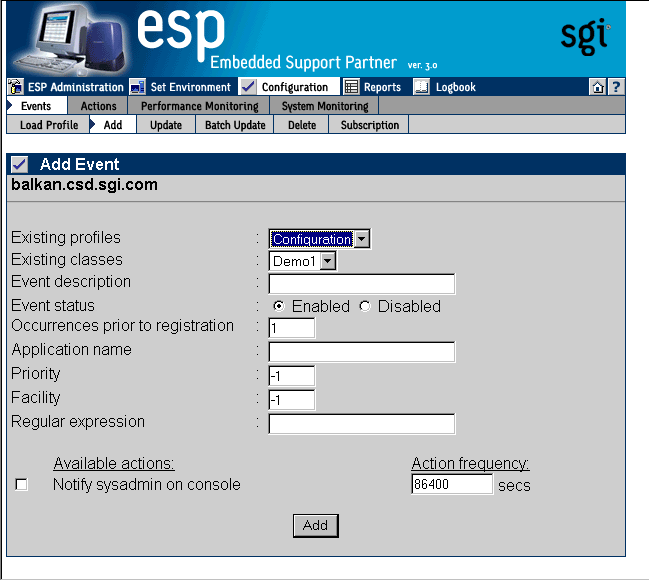
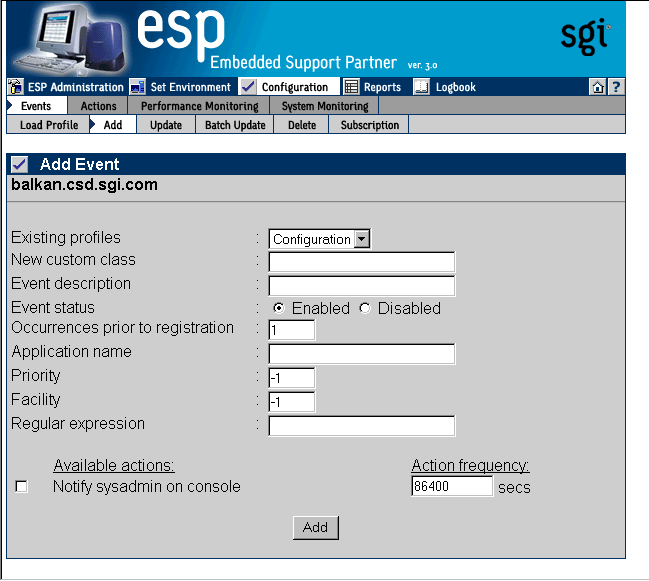
The interface displays the Add Event window. (Refer to Figure 5-3.)
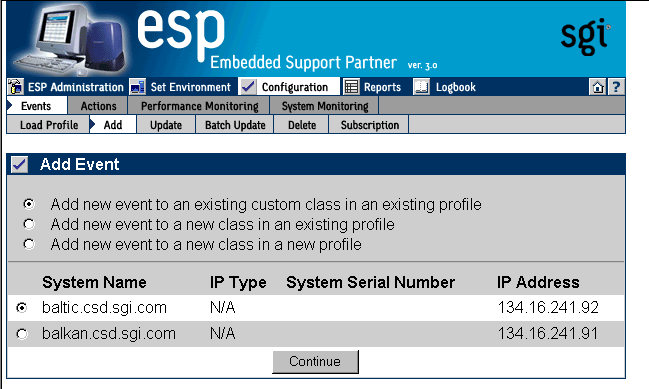
If the system is an SGM server, the interface displays a list of clients. (Refer to Figure 5-4.) Click on the client that you want to use, and click on the Continue button.)
You should be aware of the following restrictions when you add events from an SGM server:
When you select an SGM server from the System Name list, ESP adds events only to the SGM server. It does not add events to any of the SGM clients for that server. You must select an SGM client to add events to it.
You cannot use this window to add events to ESP 2.0 clients. To add events to an ESP 2.0 client from an SGM server, click on Configuration -> Events -> Subscription.
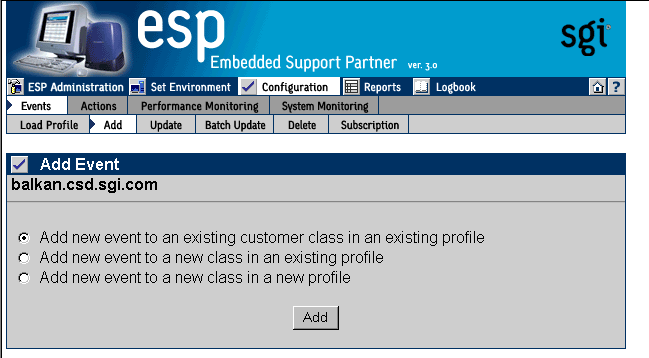
Adding an Event to an Existing Event Class in an Existing Profile
Figure 5-5 shows the Add Event window when you choose the Add new event to an existing customer class in an existing profile option. Use this option to add an event to an event class that you already created. (You can only add events to the event classes that you create; you cannot add events to the default event classes.)
Perform the following procedure to use this window to add an event to an existing event class:
Choose the event profile.
Choose the event class.
Enter a description of the event in the Event Description field. ESP displays this description on other pages of the interface to identify the event.
Note: The description cannot include the following characters: ` < Specify a status for the event:
Click on Enabled to add the event to the database and to start monitoring it.
Click on Disabled to add the event to the database but not monitor it.
Specify the number of times that the event must occur before ESP registers it (and performs any assigned actions) in the Occurrences prior to registration field.
Set the following optional parameters to provide more information about the event:
Application name
Priority value
Facility value
Regular expression to match
Assign an action to the event. (If Event status is set to Enabled, ESP performs this action when the event is registered.)
Specify the number of seconds that ESP should pause between multiple executions of an action in the Action frequency time field. (A value of 0 disables the option.)
For example, if you set this parameter to 5 seconds and ESP registers an event every second, ESP executes the assigned action(s) every 5 seconds.
Figure 5-6 shows the Add Event window with example parameters.
Click on the Add button.
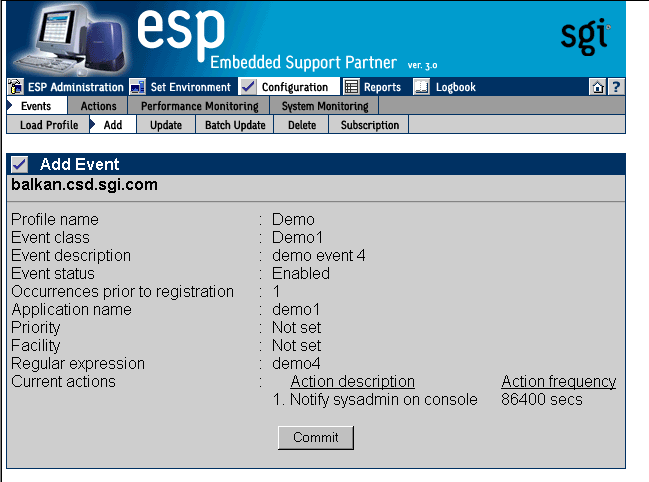
The interface displays a verification message. (Refer to Figure 5-7.)
Click on the Commit button.
The interface displays information about the event that was added. (Refer to Figure 5-8.) If you need to update the event, click on the Update button.
Be sure to note the sequence number assigned to the event (located in the event description next to the event name). You need this number to register the event in ESP from an external application. (Refer to Chapter 9, “Logging Events from Applications and Scripts.”)

Adding an Event to a New Event Class in an Existing Event Profile
Figure 5-9 shows the Add Event window when you choose the Add new event to a new class in an existing profile option (refer again to Figure 5-3).
Perform the following procedure to use this window to add an event to a new event class:
Choose the event profile.
Enter the name of the new event class in the New custom class field.
Enter a description of the event in the Event description field. ESP displays this description on other pages of the interface to identify the event.
Note: The description cannot include the following characters: ` < Specify a status for the event:
Click on Enabled to add the event to the database and to start monitoring it.
Click on Disabled to add the event to the database but not monitor it.
Specify the number of times that the event must occur before ESP registers it (and performs any assigned actions) in the Occurrences prior to registration field.
Set the following optional parameters to provide more information about the event:
Application name
Priority value
Facility value
Regular expression to match
Assign an action to the event. (If Event status is set to Enabled, ESP performs this action when the event is registered.)
Specify the number of seconds that ESP should pause between multiple executions of an action in the Action frequency time field. (A value of 0 disables the option.)
For example, if you set this parameter to 5 seconds and ESP registers an event every second, ESP executes the assigned action(s) every 5 seconds.
Figure 5-10 shows the Add Event window with example parameters.
Click on the Add button.
The interface displays a verification message. (Refer to Figure 5-11.)
Click on the Commit button.
The interface displays information about the event that was added. (Refer to Figure 5-12.) If you need to update the event, click on the Update button.
Be sure to note the sequence number assigned to the event (located in the event description next to the event name). You need this number to register the event in ESP from an external application. (Refer to Chapter 9, “Logging Events from Applications and Scripts.”)


Adding an Event to a New Event Class in a New Event Profile
Figure 5-13 shows the Add Event window when you choose the Add new event to a new class in a new profile option (refer again to Figure 5-3).
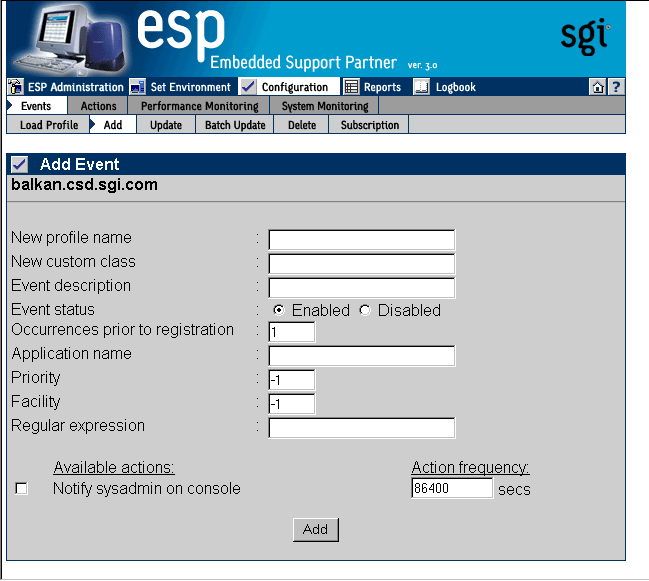
Perform the following procedure to use this window to add an event to a new event class:
Enter the name of the new event profile in the New profile name field.
Enter the name of the new event class in the New custom class field.
Enter a description of the event in the Event description field. ESP displays this description on other pages of the interface to identify the event.
Note: The description cannot include the following characters: ` < Specify a status for the event:
Click on Enabled to add the event to the database and to start monitoring it.
Click on Disabled to add the event to the database but not monitor it.
Specify the number of times that the event must occur before ESP registers it (and performs any assigned actions) in the Occurrences prior to registration field.
Set the following optional parameters to provide more information about the event:
Application name
Priority value
Facility value
Regular expression to match
Assign an action to the event. (If Event status is set to Enabled, ESP performs this action when the event is registered.)
Specify the number of seconds that ESP should pause between multiple executions of an action in the Action frequency time field. (A value of 0 disables the option.)
For example, if you set this parameter to 5 seconds and ESP registers an event every second, ESP executes the assigned action(s) every 5 seconds.
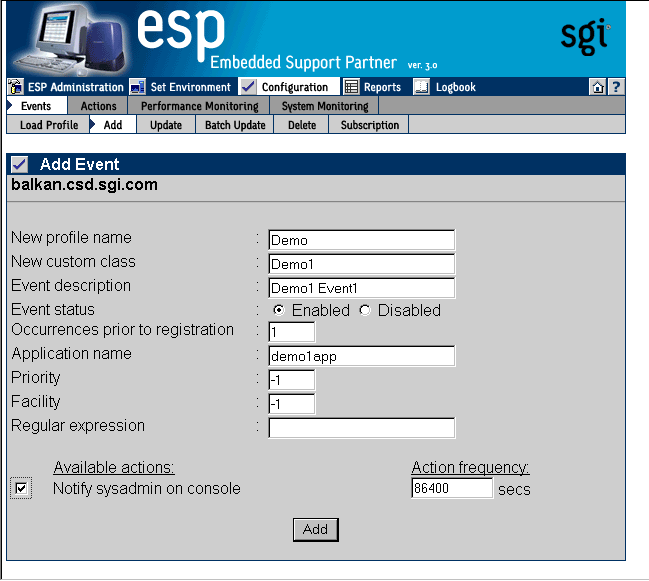
Figure 5-14 shows the Add Event window with example parameters.
Figure 5-14. Add Event Window with Example Parameters (Adding an Event to a New Class in a New Profile)
Click on the Add button.
The interface displays a verification message. (Refer to Figure 5-15.)
Figure 5-15. Verification Message for Adding an Event (Adding an Event to a New Class in a New Profile)

Click on the Commit button.
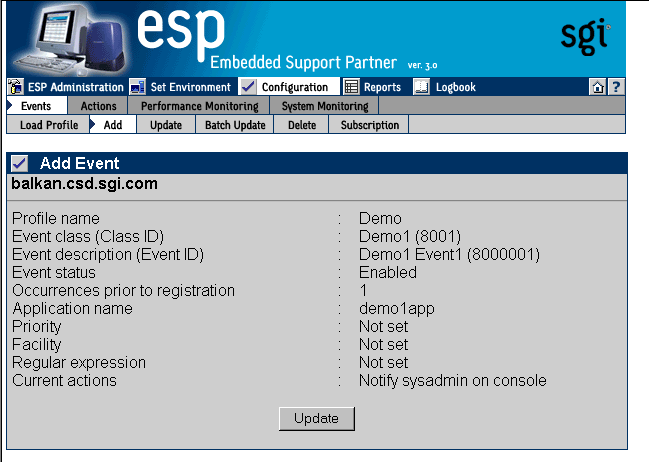
The interface displays information about the event that was added. (Refer to Figure 5-16.) If you need to update the event, click on the Update button.
Be sure to note the sequence number assigned to the event (located in the event description next to the event name). You need this number to register the event in ESP from an external application. (Refer to Chapter 9, “Logging Events from Applications and Scripts.”)
Figure 5-16. Confirmation Message for Adding an Event (Adding Event to a New Class in a New Profile)
Use the following espconfig command syntax to add an event:
/usr/sbin/espconfig -add evtype    -td <type description>
    {-cid <class id> | -cd <class description>}
    [-throttle <throttle value>]
    [-enable | -disable]
    [-log | -nolog]
    [-acfreq <action frequency value>]
    [-acid <action id> | -acd  <action description>]
    [-pri <priority>] [-fac <facility>]
    [-appname <app name>] [-regexp <reg expression>]
    [-prfid <profile id> | -prfn <profile name>]
    [-sgmclient <client alias> | -sysid <client system id>]
|
Use the -td option to specify the type description (a string enclosed in quotes that describes the event). Use the -cid option to specify an existing event class ID, or use the -cd option to provide an existing or new class description (a string enclosed in quotes that describes the class). If the class does not exist, ESP creates a new class.
Use the -throttle option to specify the throttling value, which is the number of times the event must occur before ESP registers it. If you do not specify this option, the default value of 1 is used.
Use the -enable or -disable option to specify whether the event is enabled or disabled. You can specify only one of these options at a time. If you do not specify this option, the event is disabled by default.
Use the -log or -nolog option to specify if ESP should log the event.
Use the -acid option to assign an action to the event by specifying an existing action ID, or use the -acd option to assign an action to an event by specifying an action description (a string enclosed in quotes that describes the action). If you do not specify an action, no action is assigned to the event by default.
Use the -pri, -fac, -appname, and -regexp options to provide more information about the event (priority, facility, application name, and regular expression).
Use the -prfid or -prfn option to add the event to an event profile.
Use the -sgmclient or -sysid to add the event to an SGM client.
Use the following syntax to update add an event class:
/usr/sbin/espconfig -add evclass -cid <class id> -cd <class description> [-sgmclient <client alias> | -sysid <client system id>] |
Use the -cid option to specify the event class by class ID. Use the -cd option to specify a new class description (a string enclosed in quotes).
Use the -sgmclient or -sysid option to select the SGM client on which you want to update the event information.
You can also update the parameters for existing events.
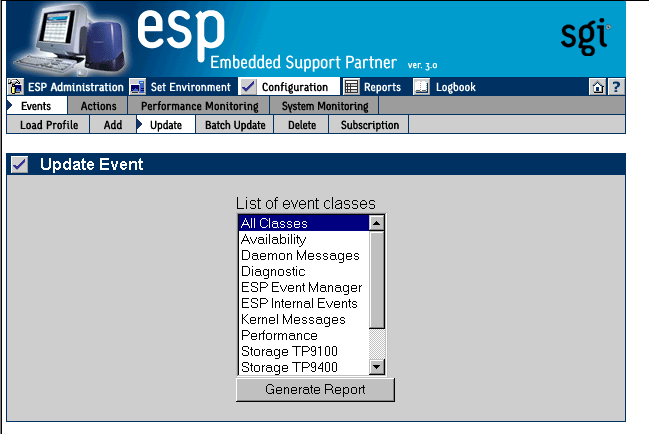
Perform the following procedure to use the Web-based interface to update an event:
Click on the Configuration button.
Click on the Events button.
Click on the Update button.
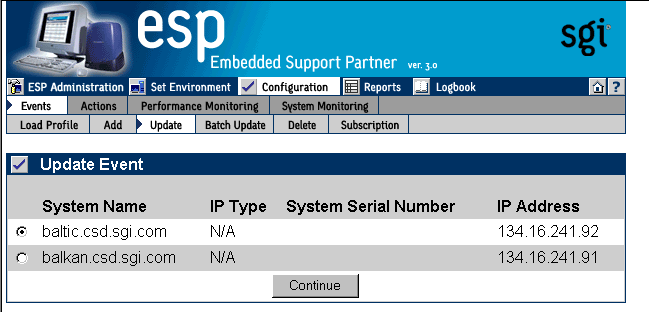
Note: If you are using ESP on a system group manager, the interface displays the Update Event window with a list of SGM clients. (Refer to Figure 5-17.) Select the system on which you want to update the event, and click on the Continue button.
The interface displays the Update Event window. (Refer to Figure 5-18.)
Click on the event class that contains the event that you want to update.
Click on the Generate Report button.
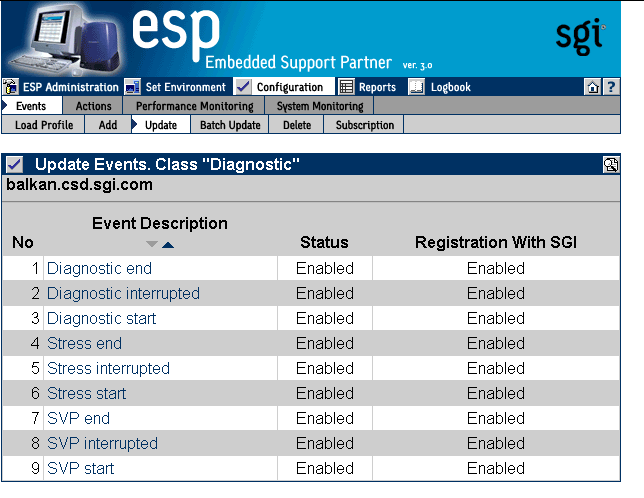
The interface displays a list of all events in the event class that you selected. (Refer to Figure 5-19.)
Click on the description of the event that you want to update.
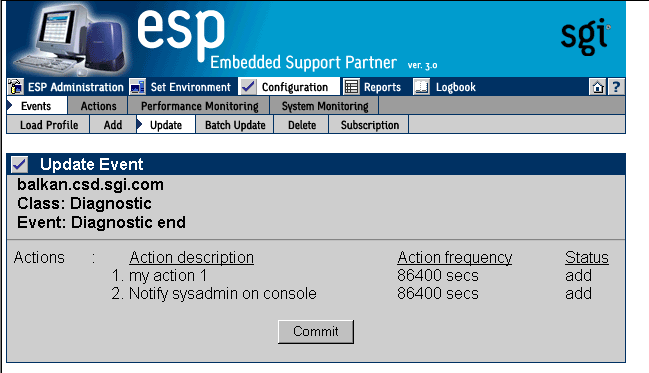
The interface displays the Update Event window with the information for the event that you selected. (Refer to Figure 5-20.)
You cannot modify the parameters for single events in the availability, configuration, and diagnostics classes. You must use the Batch Update command to update these parameters for events in those classes. (The Live event in the availability class is the exception; you can modify all parameters for this event.)
You cannot update the Event Status parameter for individual events in the availability, system configuration, or diagnostics event classes. Use the Batch Update command to update these parameters.
Update the Event Status parameter:
Click on Enabled to add the event to the ESP event list on your system and start monitoring it.
Click on Disabled to add the event to the ESP event list on your system but not monitor it.
Update the Registration with SGI parameter:
Click on Enabled to specify that ESP should return information about the event to SGI when the event occurs.
Click on Disabled to specify that ESP should not return information about the event to SGI when the event occurs.
The Registration with SGI parameter provides individual control over specific events that ESP returns to SGI. To use this parameter, you must also enable the global Registration with SGI parameter.
When the Registration with SGI global configuration parameter is enabled in the Global Configuration window (refer to Figure 4-7 on page 98), the Registration with SGI parameter for each event takes precedence for the individual events. When the Registration with SGI global configuration parameter is disabled, the Registration with SGI parameter for individual events does not affect ESP operation.
The Registration with SGI parameter is not available for custom events. ESP never returns information about custom events to SGI.
Update the Occurrences prior to registration parameter.
Select the actions to assign to the event.
Update the Action frequency time parameter for each action.
Click on the Update button.
The interface displays a verification message that shows the changes that you selected. (Refer to Figure 5-21.)
Click on the Commit button.
The interface displays a confirmation message that shows the updated event in bold. (Refer to Figure 5-22.)


You can use the espconfig command to update event information:
Use the following command syntax to update an event:
/usr/sbin/espconfig -update evtype -tid <type id>
     [-cid <class id> | -cd <class description>]
     [-sgmclient <client alias> | -sysid <client system id>]
     [-td <type description>]
     [-throttle <throttle value>]
     [-enable | -disable]
     [-log | -nolog]
     [-acfreq <action frequency value>]
     [-acid <action id> | -acd  <action description> |
     -noacid <action id> | -noacd  <action description>]
        [-acid <action id> | -acd  <action description>]
        [-pri <priority>] [-fac <facility>]
        [-appname <app name>] [-regexp <reg expression>]
        [-prfid <profile id> | -prfn <profile name> |
        -noprfid <profile id> | -noprfn <profile name>]
Use the -cid option to specify an existing event class ID, or use the -cd option to provide a class description (a string enclosed in quotes that describes the class).
Use the -sgmclient or -sysid option to select the SGM client on which you want to update the event information.
Use the -tid option to specify the event to update. (You must provide a unique event type ID.)
Use the -td option to update the event description. (You can only update custom event descriptions. You must provide a string enclosed in quotes.)
Use the -throttle option to update the throttling value, which specifies the number of times that the event must occur before ESP registers it.
Use the -enable option to enable registration of the event, or use the -disable option to disable registration of the event.
Use the -log or -nolog option to specify if ESP should log the event.
Use the -acid and -acd options to assign actions to the event. (This command can add only one action at a time; if you want to assign more than one action to an event, you must enter the command multiple times.) Specify an action ID with the -acid option. Specify a string enclosed in quotes with the -acd option.
Use the -noacid and -noacd options to remove an action that is already assigned to the event. Specify an action ID with the -noacid option. Specify a string enclosed in quotes with the -noacd option.
Use the -pri, -fac, -appname, and -regexp options to provide more information about the event (priority, facility, application name, and regular expression).
Use the -prfid or -prfn option to add the event to an event profile.
Use the -noprfid or -noprfn to remove the event from an event profile.
Use the following syntax to update a custom class description:
/usr/sbin/espconfig -update evclass -cid <class id> -cd <class description> [-sgmclient <client alias> | -sysid <client system id>]
Use the -cid option to select the event class by class ID. Use the -cd option to specify a new class description (a string enclosed in quotes).
Use the -sgmclient or -sysid option to select the SGM client on which you want to update the event information.
You can update multiple events at the same time by using the “batch update” feature. The “batch update” feature enables you to select more than one event at a time and apply parameter changes to all of the selected events.
Perform the following procedure to use the Web-based interface to update multiple events at the same time:
Click on the Configuration button.
Click on the Events button.
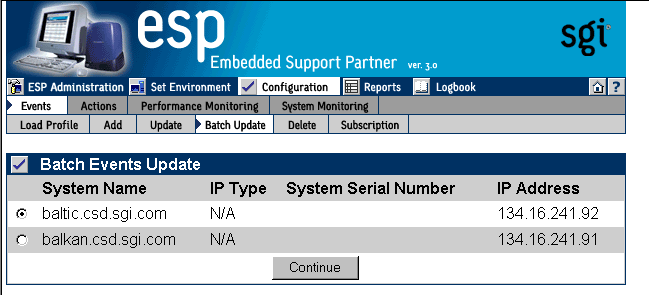
Click on the Batch Update button.
If you are using ESP on a system group manager, the interface displays the Update Event window with a list of SGM clients. (Refer to Figure 5-23.) Select the system on which you want to update events, and click on the Continue button.
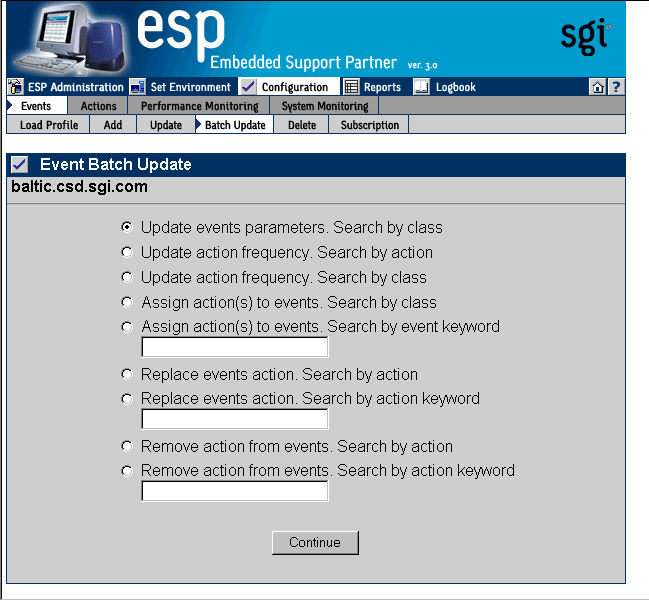
The interface displays the Event Batch Update window. (Refer to Figure 5-24.)
Click on the radio button next to the batch operation you want to perform. (Table 5-1 describes the batch operations and the procedure to use each operation.)
Table 5-1. Batch Update Options
Option
Description
Update events parameters. Search by class
Updates the event parameters for an entire class of events
Perform the following procedure:
1. Click on the Continue button
2. Choose the class of events that you want to update
3. Click on the Update button
4. Update the Event Status and Registration with SGI values
5. Click on the Update button
6. Click on the Commit button
Update action frequency. Search by action
Updates the action frequency for multiple events
Perform the following procedure:
1. Click on the Continue button
2. Click on the action that you want to update
3. Click on the Continue button
4. Uncheck the checkmark for any event classes that you do not want to update, or click on a class description to update actions assigned to individual events in the class
5. Update the Action Frequency values
6. Click on the Update button
Update action frequency. Search by class
Updates the action frequency for multiple events
Perform the following procedure:
1. Click on the Continue button
2. Choose the class of events that you want to update
3. Click on the Continue button
4. Update the Action Frequency values
5. Click on the Update button
Assign action(s) to events. Search events by class
Assigns an action to an entire class of events
Perform the following procedure:
1. Click on the Continue button
2. Choose one or more classes of events
3. Choose one or more actions
4. Click on the Assign Action button
5. If you selected only one event class, select the check box for any events for which you do not want to assign the action
6. Click on the Commit button
Assign action(s) to events. Search by event keyword
Assigns an action to events that match a specific keyword
Perform the following procedure:
1. Enter the keyword in the box
2. Click on the Continue button
3. Select the events to which you want to assign the action
4. Click on the Assign Action button
5. Select one or more actions
6. Click on the Assign Action button
7. Deselect the check box for any events for which you do not want to assign the action
8. Click on the Commit button
Replace events action. Search events by action
Replaces the assigned action for an event
Perform the following procedure:
1. Click on the Continue button
2. Select the actions to replace
3. Select the new action
4. Click on the Replace Action button
5. Deselect the check box for any events for which you do not want to replace the action
6. Click on the Commit button
Replace events action. Search by action keyword
Replaces the assigned action for an event
Perform the following procedure:
1. Enter the keyword in the box
2. Click on the Continue button
3. Select the actions to replace
4. Select the new action
5. Click on the Replace Action button
Remove action from events. Search action
Removes an assigned action from an event
Perform the following procedure:
1. Click on the Continue button
2. Select the action to remove
3. Click on the Remove Action button
4. Deselect the check box for any events for which you do not want to delete the action
5. Click on the Commit button.
Remove action from events. Search by action keyword
Removes an assigned action from an event (finds event-action combination by searching for an action)
Perform the following procedure:
1. Enter the keyword in the box
2. Click on the Continue button
3. Select the action to remove
4. Click on the Remove Action button
5. Deselect the check mark for any events for which you do not want to delete the action
6. Click on the Commit button
You can delete custom events that you added to ESP on your system.
| Warning: Deleting an event removes all records that are associated with the event from the database. After you delete an event, you will not be able to retrieve information about any occurrences of the event on your system. |
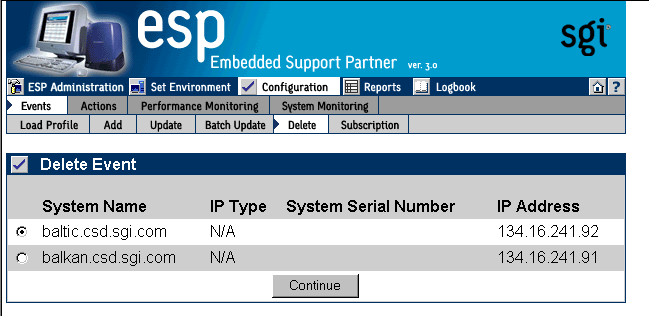
Perform the following procedure to use the Web-based interface to delete an event:
Click on the Configuration button.
Click on the Events button.
Click on the Delete button.
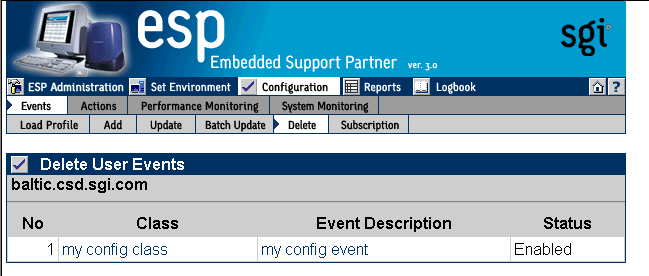
Note: If the system is an SGM server, the interface displays a list of clients. (Refer to Figure 5-25.) Click on the client that you want to use, and click on the Continue button.) The interface displays the Delete User Events window. (Refer to Figure 5-26.)
Click on the description of the event that you want to delete, or click the name of event class to delete an entire class of events.
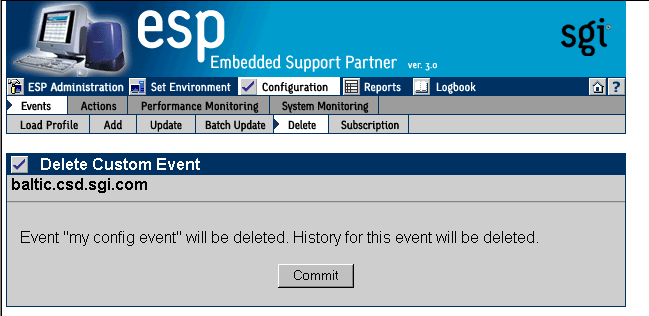
The interface displays a verification message. (Refer to Figure 5-27.)
Click on the Commit button.
The interface displays a confirmation message. (Refer to Figure 5-28.)

You can use the espconfig command to delete events and event classes:
Use the following command syntax to delete an existing custom event:
/usr/sbin/espconfig -delete evtype {-tid <type id> | -td <type description>} [-sgmclient <client alias> | -sysid <client system id>]Use the -tid option to specify an event ID, or use the -td option to specify an event description (a string enclosed in quotes).
Use the -sgmclient or -sysid option to specify an SGM client.
Note: If the event description is not unique, the command displays a table of matching events and event IDs. When this occurs, use an event ID from the table with the -td option to delete an event. If the event to delete is the last event in a custom class, this command also deletes the event class.
Use the following command syntax to delete an entire custom event class:
/usr/sbin/espconfig -delete evclass {-cid <class id>|-cd <class description>} [-sgmclient <client alias> | -sysid <client system id>]Use the -cid option to specify an event class ID, or use the -cd option to specify an event class description (a string enclosed in quotes).
Use the -sgmclient or -sysid option to select the SGM client on which you want to update the event information.
Use the following command syntax to delete all event-related data structures (types, classes, actions, and so on) in the system support database:
/usr/bin/espconfig -delete events [-sysid <system id> | -host <host name>]
Use the -sysid option to select a system by system ID. Use the -host option to select a system by hostname. If you do not specify the -sysid or -host option, this command deletes data from the database tables on the local system.
You can select which events to subscribe from the SGM clients.
| Tip: ESP 3.0 includes an automatic subscription option. If you enable the Automatic events subscription option when you add a client, ESP automatically subscribes events from the client. Then, you do not need to manually subscribe events via the Subscription button |
Perform the following procedure to use the Web-based interface to subscribe to events:
Click on the Configuration button.
Click on the Events button.
Click on the Subscription button.
Note: If the system is an SGM server, the interface displays a list of clients. (Refer to Figure 5-29.) Click on the client that you want to use, and click on the Continue button. The interface displays the Events Subscription by Class window. (Refer to Figure 5-30.)
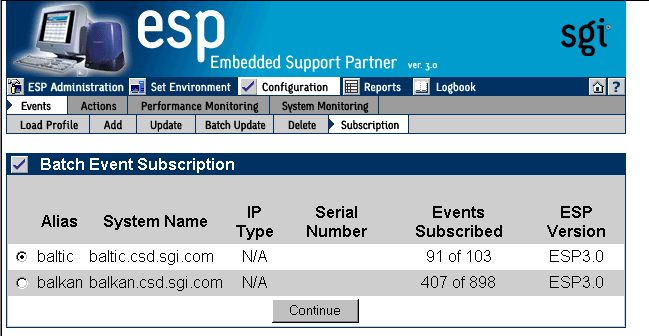
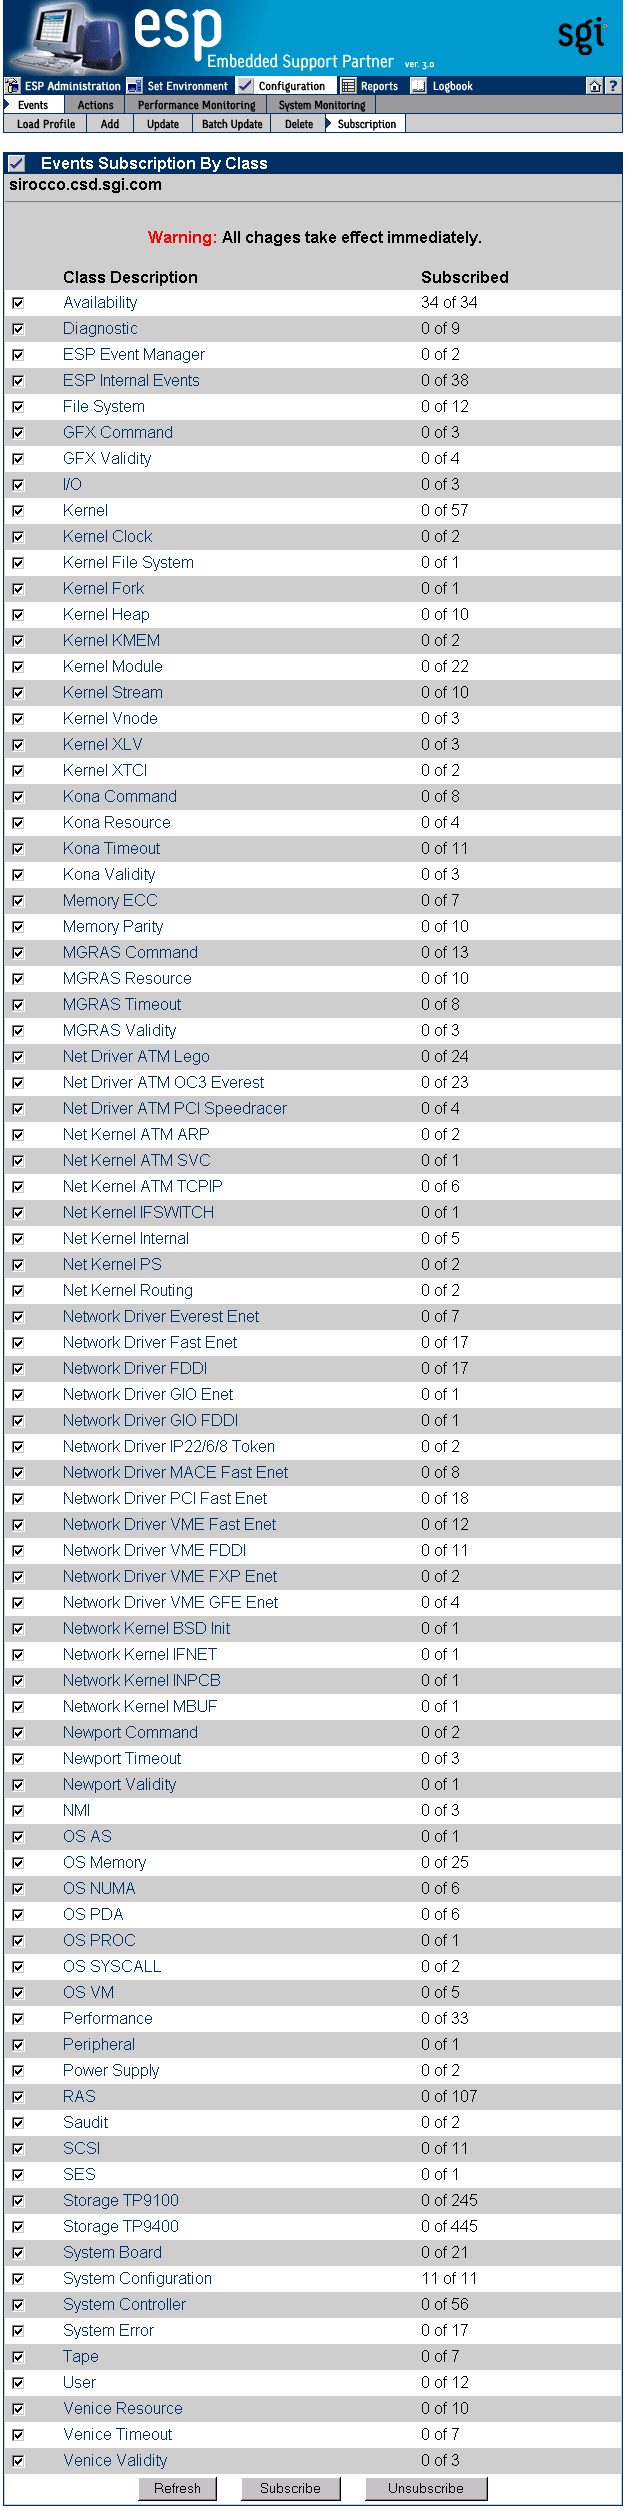
This window displays all event classes available on the selected client.
Set the check mark to select an entire class for subscription or unsubscription.
Click on a class description to access the individual events in a class. The interface displays the current status of all events in the class.
Click on the Subscribe button to subscribe all events in a class. (ESP subscribes all events in the class that have event registration enabled on the SGM client.)
Click on the Unsubscribe button to unsubscribe all events in a class. (ESP unsubscribes all events in the class.)
If no event classes are listed for an ESP 2.0 client, click on the Refresh button. ESP retrieves the event list from the ESP 2.0 client, stores the list on the SGM server, and displays the list of available event classes. You can use the Refresh button to verify subscribed events.
Note: The Refresh button does not appear for ESP 3.0 clients. Use the Refresh All Profiles button in the Event Profiles window (accessible via Configuration -> Events -> Load) to refresh event information from an ESP 3.0 client.
You can use the espconfig command to subscribe and unsubscribe events:
Use the following command syntax to subscribe events:
/usr/sbin/espconfig -subscribe evtype
     [-cid <class id>|-cd <class desc>]
     [-tid <type id>|-td <type desc>]
     [-pri <priority>] [-fac <facility>]
     [-appname <application name>]
     [-sgmclient <client alias>|-sysid <client system id >]
Use the following command syntax to unsubscribe events:
/usr/sbin/espconfig -unsubscribe evtype
     [-cid <class id>|-cd <class desc>]
     [-tid <type id>|-td <type desc>]
     [-pri <priority>] [-fac <facility>]
     [-appname <application name>]
     [-sgmclient <client alias>|-sysid <client system id >]
Actions are commands that ESP performs in response to events if you set up event/action assignments. An event/action assignment specifies the action that ESP should perform for a specific event when it registers a specific number of events. Example actions include sending an e-mail message and sending a page.
Use ESP to perform the following activities to manage actions on your system:
View existing actions
Add actions
Update existing actions
Disable actions
You can use the espconfig command to view the existing actions.
Use the following command syntax to list event actions. It lists the action IDs and action descriptions from the event action fields.
/usr/sbin/espconfig -list evaction
Use the following command syntax to view all parameters for an action:
/usr/sbin/espconfig -show evaction {-acid <action id> | -acd <action description>}This command shows the fields in the following format:
begin : eventAction
    		actionId          : 4
    		throttle          : 1
    		action            : "/usr/bin/espnotify -A \"%D\""
    		retryCount        : 0
    		timeout           : 10
    		user              : "root"
    		actionDescription : "Notify sysadmin on console"
    		disabled          : "NO"
	end   : eventAction
Use the -acid option to specify an action ID, or use the -acd option to specify an action description (a string enclosed in quotes).
You can customize ESP by adding new actions.
Perform the following procedure to use the Web-based interface to add actions:
Click on the Configuration button.
Click on the Actions button.
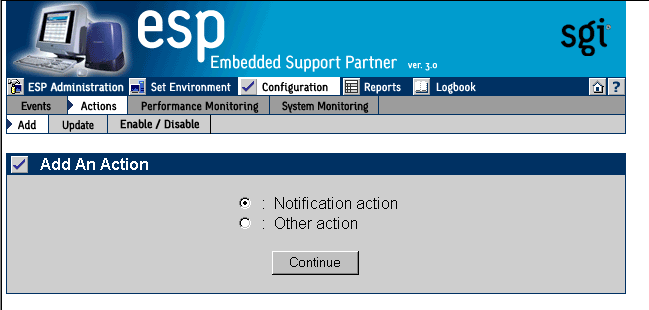
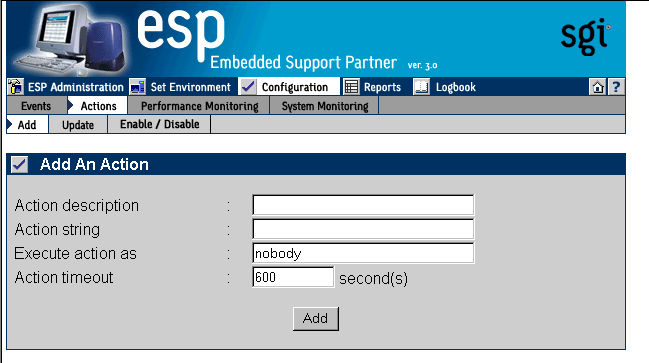
The interface displays the Add an Action window. (Refer to Figure 5-31.)
Specify how you want to create the action string:
To have ESP build a notification action string from menu options that you select, click on the radio button next to Notification action. (Use this option if you do not know the appropriate syntax of the espnotify command for the notification that you want to create.)
To manually enter the action string, click on the radio button next to Other action. (Use this option if you know the syntax of the espnotify command for the notification that you want to create or if you want to create an action that is not a notification.)
Click on the Continue button.
The interface updates the Add An Action window. The following subsections describe how to use this window.
Using the Notification Action Option
Figure 5-32 shows the Add an Action window when you choose the Notification Action option.
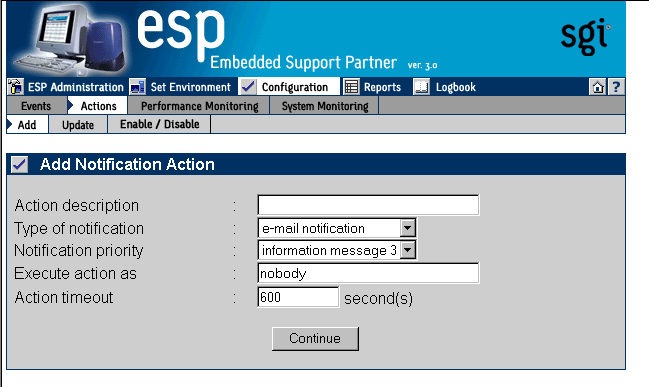
Perform the following procedure to use this window to create an action:
Enter a description for the action. ESP displays this description on other pages of the interface.
Select the type of notification that you want to create (e-mail notification, system console notification, or GUI pop-up notification).
Select the priority of the notification.
Enter the user account that will execute the command. (The default is the nobody account.)
Enter the amount of time that ESP should wait for the action to execute (timeout value). If the action does complete within this period of time, ESP kills the action.
Click on the Continue button.
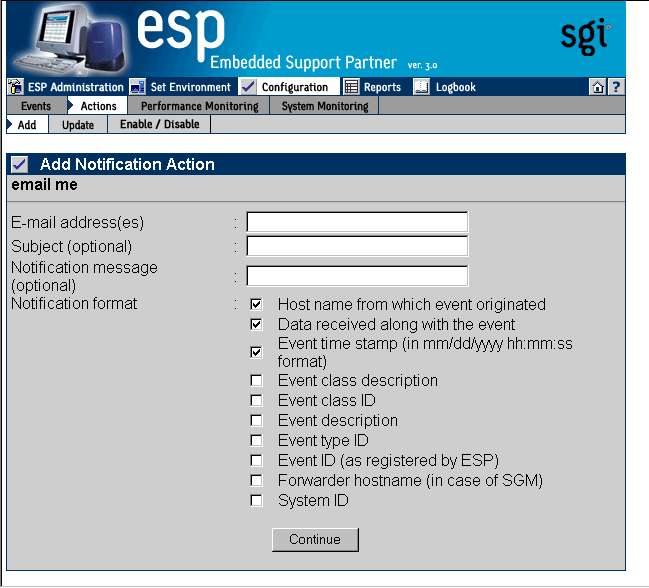
If you selected e-mail notification, ESP displays the window shown in Figure 5-33.
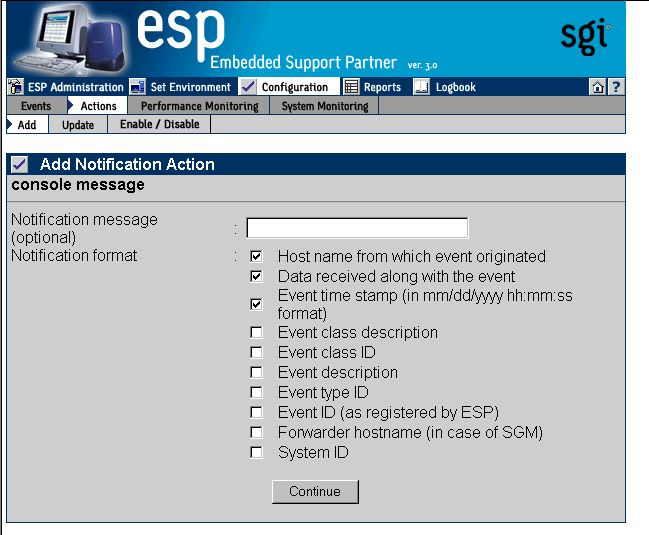
If you selected notify on console, ESP displays the window shown in Figure 5-34.
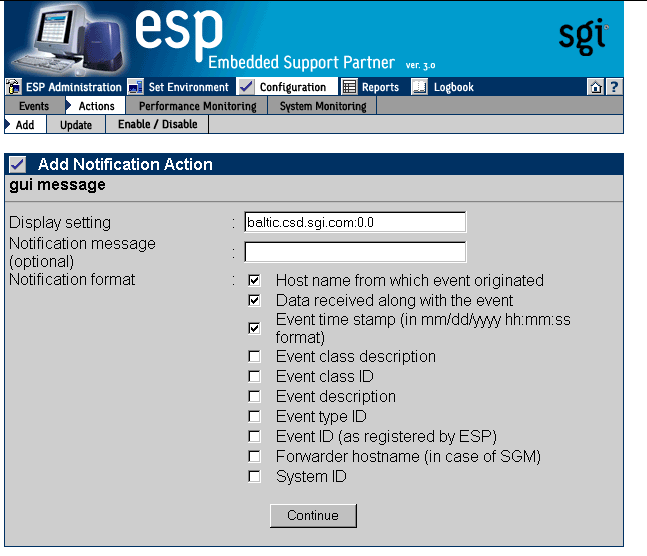
If you selected GUI pop-up notification, ESP displays the window shown in Figure 5-35.
Set the parameters for the action.
Table 5-2 describes the parameters that are available for each type of notification.
Table 5-2. Notification Action Parameters
Notification Type
Parameter
Description
E-mail notification
E-mail address(es)
Specifies the e-mail address(es) that receive an e-mail notification
Tip: Separate multiple e-mail addresses with a space, a comma, or a semicolon.
Subject
Specifies the subject of the e-mail notification
Tip: The message cannot include quotation marks (single or double).
Notification message
Specifies a message to add to the end of the notification
Tip: The message cannot include quotation marks (single or double).
Notification format
Specifies event information to include in the notification
Console Notification
Notification message
Specifies a message to add to the end of the notification
Tip: The message cannot include quotation marks (single or double).
Notification format
Specifies event information to include in the notification
GUI pop-up notification
Display setting
Specifies the X Window System display to use
Notification message
Specifies a message to add to the end of the notification
Tip: The message cannot include quotation marks (single or double).
Notification format
Specifies event information to include in the notification
Click on the Continue button.
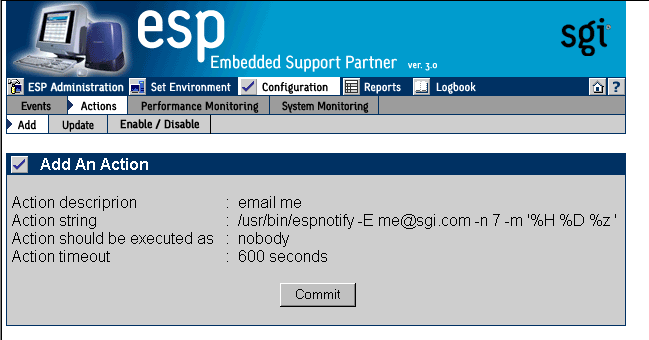
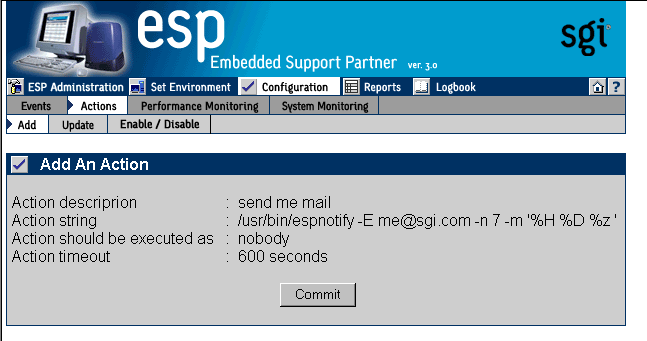
The interface displays a verification message. (Refer to Figure 5-36.)
Click on the Commit button.
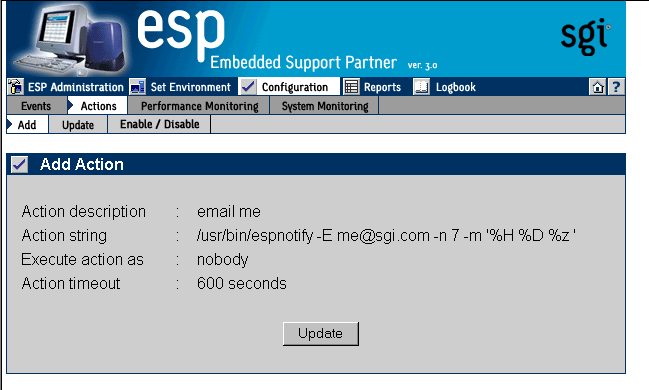
The interface displays a confirmation message. (Refer to Figure 5-37.) If you need to update the action parameters, click on the Update button.
Using the Other Action Option
Figure 5-38 shows the Add An Action window when you choose the Other Action option.
Perform the following procedure to use this window to create an action:
Enter a description for the action. ESP displays this description on other pages of the interface.
Enter a command to execute as a action. (For example, you could use the espnotify command to send an e-mail. Refer to Chapter 8, “Sending Notifications,” for more information about using the espnotify command to send notifications.)
Note: If you want to create a standard notification, it is easiest to use the Notification Action option in the Add An Action window. (Refer to Figure 5-31.) 
Tip: When you use the espnotify command, you can include several variables in the <message> parameter. (Table 5-3 describes the variables.) Table 5-3. espnotify Parameters
Variable
Description
%C
Event class
%T
Event type
%D
Event data
%H
Host where the event originated
%S
Time when the event occurred (in seconds since 00:00:00 UTC on January 1, 1970)
%F
Host that forwarded the event
%I
System ID
%t
Current time string
%s
Current time (in seconds since 00:00:00 UTC on January 1, 1970)
%m
Current minute of the hour
%M
Current month of the year
%h
Current hour of the day
%y
Current year
%d
Current day of the month
Enter the user account that will execute the command. (The default is the nobody account.)
Enter the amount of time that ESP should wait for the action to execute (timeout value). If the action does complete within this period of time, ESP kills the action.
Figure 5-39 shows the Add an Action window with example parameters.
Click on the Add button.
The interface displays a verification page. (Refer to Figure 5-40.)
Click on the Commit button.
The interface displays a confirmation message. (Refer to Figure 5-41.) If you need to update the action parameters, click on the Update button.


Use the following espconfig command syntax to add an action:
/usr/sbin/espconfig -add evaction  -acd <action description>
          -act <action string>
          [-user <name>]
          [-retry <count>]
          [-tout <timeout value>]
          [-throttle <throttle value>]
          [-enable | -disable]
|
Use the -acd option to specify a description of the action (a string enclosed in quotes).
Use the -act option to specify the command (a string enclosed in quotes) that the action performs.
Use the -user option to specify the UNIX user that executes the action. If you do not specify a user, ESP uses the default user nobody.
Use the -retry option to specify the number of times that ESP should perform the action before stopping. If you do not specify a value, ESP uses the default value 0.
Use the -tout option to specify the amount of time (in seconds) that ESP should wait for the action to execute. If the action does not complete before the timeout period expires, ESP kills the action command. If you do not specify a value, ESP uses the default value 0.
Use the -throttle option to specify the throttling value for the action, which specifies the number of times an event must occur before ESP performs the action. If you do not specify a value, ESP uses the default value 1.
Use the -enable option to enable the action, or use the -disable option to disable the action.
You can update actions to customize them for your site.
Perform the following procedure to use the Web-based interface to update an action:
Click on the Configuration button.
Click on the Actions button.
Click on the Update button.
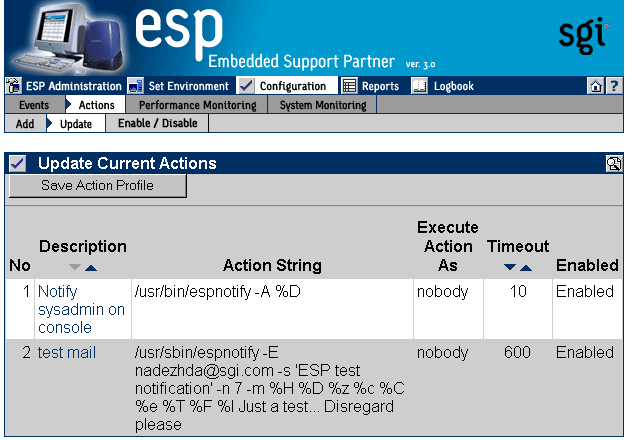
The interface displays the Update Current Actions window. (Refer to Figure 5-42.)
Tip: The Save Action Profile button in the Update Current Actions window saves all current actions in an action profile (/var/esp/init/eventprofiles/Actions.esp). You can copy this file to another system and load the profile (using the same method as loading event profiles) to have the same actions on that system. ESP does not automatically save actions in an action profile. You must click on the Save Action Profile button to save the current actions in an action profile. Click on the description of the action that you want to update.
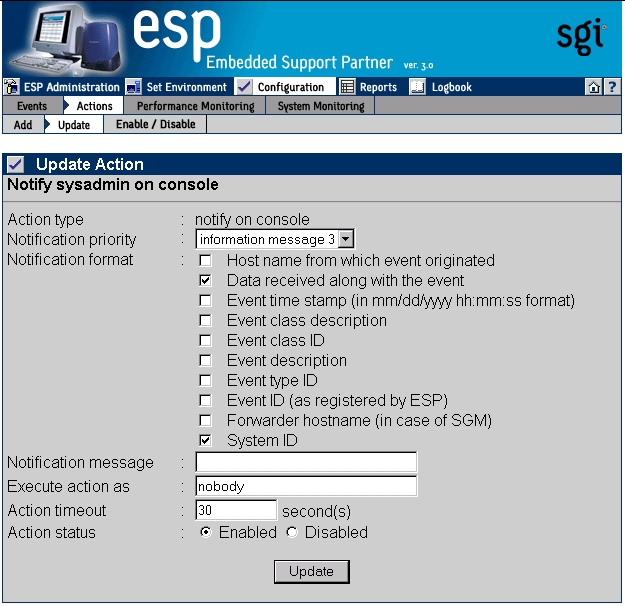
The interface displays the Update Action window. (Refer to Figure 5-43.)
Update the parameters.
Click on the Update button.
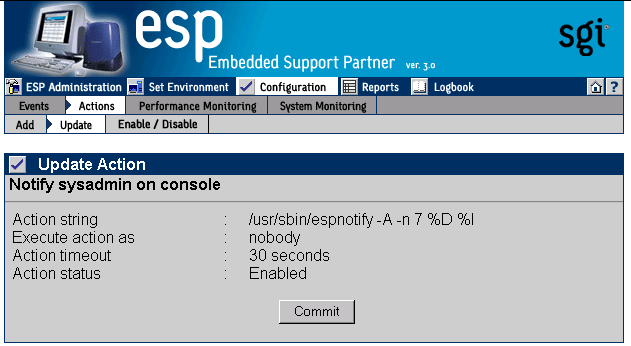
The interface displays a verification window. (Refer to Figure 5-44.)
Click on the Commit button.
The interface displays a confirmation message. (Refer to Figure 5-45.) If you need to update the parameters again, click on the description of the action.

Use the following espconfig command syntax to update an action:
/usr/sbin/espconfig -update evaction
         {-acid <action id> [-acd <new action description>] |
         -acd <action description>}
         [-act <action string>]
         [-user <name>]
         [-retry <count>]
         [-tout <timeout value>]
         [-throttle <throttle value>]
         [-enable | -disable]
|
Use the -acid option to select an action by action ID. If you use the -acd option with the -acid option, this command updates the action description.
Use the -acd option to select an action by description (a string enclosed in quotes).
| Note: If you do not specify any of the following options, ESP does not update the related action parameters. |
Use the -act option to update the command (a string enclosed in quotes) that the action performs.
Use the -user option to update the UNIX user that executes the action.
Use the -retry option to update the number of times that ESP should perform the action before stopping.
Use the -tout option to update the amount of time (in seconds) that ESP should wait for the action to execute. If the action does not complete execution before the timeout period expires, ESP kills the action command.
Use the -throttle option to update the throttling value for the action, which specifies the number of times an event must occur before ESP performs the action.
Use the -enable option to enable the action, or use the -disable option to disable the action.
You can disable actions that you no longer need to use. When you disable an action, ESP does not execute it when the events to which it is assigned are registered. Disabling an action allows you to prevent a specific action from occurring without modifying the individual event-action assignments. (You can also re-enable any actions that you disable.)
| Note: ESP does not allow you to delete actions because deleting an action removes the historical data for the action from the ESP database. |
Perform the following procedure to use the Web-based interface to disable an action:
Click on the Configuration button.
Click on the Actions button.
Click on the Enable/Disable button.
The interface displays the View Current Actions window. (Refer to Figure 5-46.)
Deselect the Enabled check mark.
Click on the Commit button.
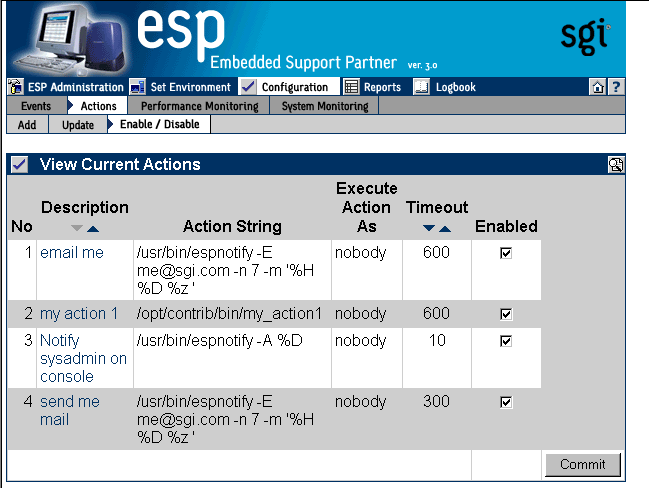
| Tip: To re-enable the action, perform the same procedure with the following difference: Set the Enabled check mark. |
ESP monitors the performance of a system by evaluating a set of performance rules at specified time intervals. Performance monitoring is disabled by default.
Perform the following procedure to use the Web-based interface to configure performance monitoring for the local system and/or any ESP 3.0 SGM clients.
Notes:
SGM clients must be directly connected to the SGM server to use this procedure; the clients cannot connect through any intermediate systems. To configure performance monitoring on an ESP 3.0 SGM client that is connected through an intermediate server, you must log into the client and configure the performance monitoring parameters directly on the client.
ESP 2.0 SGM clients are not supported by this procedure. To configure performance monitoring on an ESP 2.0 SGM client, you must log into the client and configure the performance monitoring parameters directly on the client.
Click on the Configuration button.
Click on the Performance Monitoring button.
Note: If the system is an SGM server, the interface displays a list of clients. (Refer to Figure 5-47.) Click on the client that you want to use, and click on the Continue button. The interface displays the Performance Monitoring window.
Click on the Enabled radio button to enable performance monitoring or click on the Disabled radio button to disable performance monitoring.
Note: This setting is also available in the System Monitoring window. If you change the PMIE setting in the Performance Monitoring window, the setting also changes in the System Monitoring window. Set the Enabled check marks for the PMIE rules that you want to enable.
Click on the Update button.
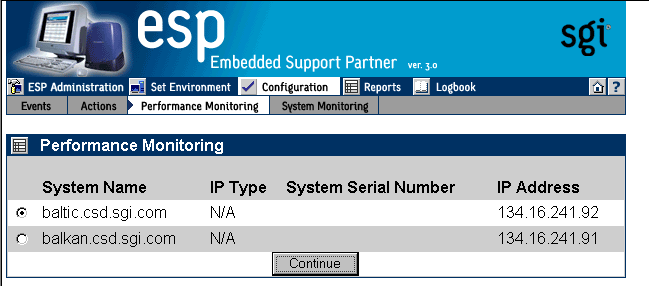
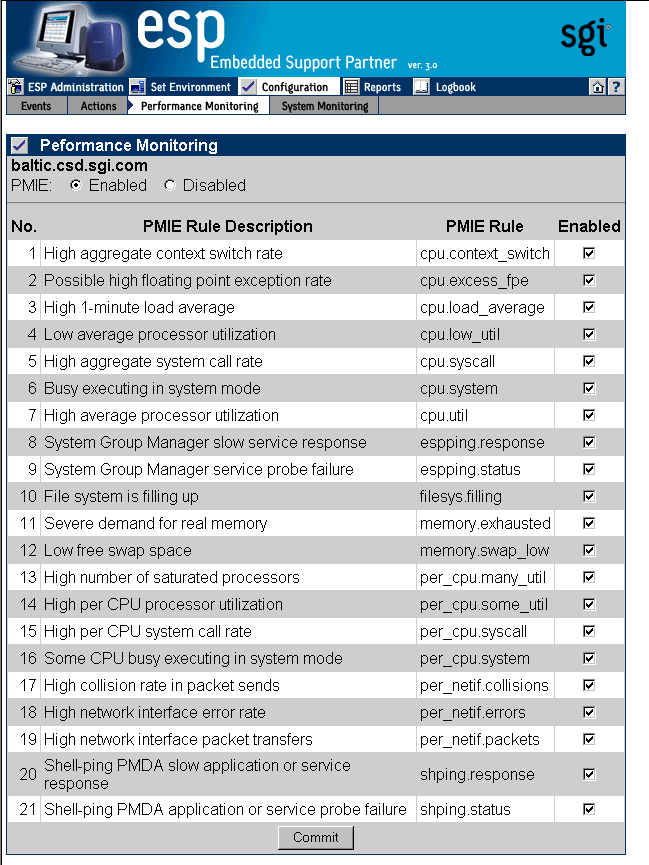
Table 5-4 describes the PMIE rules that are available and the performance issues that they detect. Refer to the Performance Co-Pilot for IA-64 Linux User's and Administrator's Guide, publication number 007-4580-00x, or the Performance Co-Pilot for IRIX User's and Administrator's Guide, publication number 007-3965-00x, for more information about PMIE rules.
Rule | Description | Performance Issue |
|---|---|---|
cpu.context_switch | High aggregate context switch rate | The average number of context switches per CPU per second exceeded a threshold value. |
cpu.excess_fpe | Possible high floating-point exception rate | Processes generating large numbers of floating-point exceptions (FPEs) were detected. Typically, this occurs when heavy system time is coupled with low system call rates. (Exceptions are delivered through the kernel to the process, taking some system time, but no system calls are serviced for the application.) |
cpu.load_average | High 1-minute load average | The current 1-minute load average exceeded a threshold value. The load average measures the number of processes that are running, executable, or soon to be executed (for example, processes in short term sleep). |
cpu.low_util | Low average processor utilization | The average processor utilization across all CPUs was below a threshold percentage. This rule is effectively the opposite of cpu.util and is disabled by default; it is useful only in specialized environments where, for example, processing is batch-oriented and low processor utilization is indicative of poor use of system resources. In such a situation, you should enable the cpu.low_util rule and disable the cpu.util rule. |
cpu.syscall | High aggregate system call rate | The average number of system calls per CPU per second exceeded a threshold value. |
cpu.system | Busy executing in system mode | The average utilization per CPU exceeded a threshold value, and the ratio of system time to busy time exceeded a threshold value. |
cpu.util | High average processor utilization | The average processor utilization across all CPUs exceeded a threshold value. |
espping.response | System Group Manager slow service response | The amount of time required for a monitored service to complete exceeded a threshold value. |
espping.status | System Group Manager service probe failure | A service that was being monitored by a group manager system failed or did not respond within a timeout period. |
filesys.filling | File system is filling up | The amount of data in the filesystem exceeded a threshold value, and the remaining space in the filesystem is filling at a rate that exceeded a threshold value. |
memory.exhausted | Severe demand for real memory | The rate at which the system is swapping modified pages out of main memory to the swap partitions exceeded a threshold value. |
memory.swap_low | Low free swap space | The amount of swap space remaining reached a threshold value. Reduce the number and size of the running programs, or add more swap(1) space before it completely runs out. |
per_cpu.many_util | High number of saturated processors | The processor utilization for a minimum number of CPUs exceeded a threshold value. This rule applies only to multiprocessor systems that have more than min_cpu_count processors. For single-processor systems, refer to the cpu.util rule. For multiprocessor systems with less than min_cpu_count processors, refer to the per_cpu.some_util rule. |
per_cpu.some_util | High per CPU processor utilization | The processor utilization for at least one CPU exceeded a threshold value. This rule applies only to multiprocessor systems with less than max_cpu_count processors. For single-processor systems, refer to the cpu.util rule. For multiprocessor systems with more than max_cpu_count processors, refer to the cpu.many_util rule. |
per_cpu.syscall | High per CPU system call rate | The number of system calls per second for at least one CPU exceeded a threshold value. This rule applies only to multiprocessor systems. For single-processor systems, refer to the cpu.syscall rule. |
per_cpu.system | Some CPU busy executing in system mode | At least one CPU was busy, and the ratio of system time to busy time exceeded a threshold value. This rule applies only to multiprocessor systems. For single-processor systems refer to the cpu.system rule. |
per_netif.collisions | High collision rate in packet sends | The number of packets that are being sent across an interface and causing collisions exceeded a threshold value. Ethernet interfaces expect a certain number of packet collisions, but a high ratio of collisions to packet sends indicates a saturated network. |
per_netif.errors | High network interface error rate | For at least one network interface, the error rate exceeded a threshold value. |
per_netif.packets | High network interface packet transfers | For at least one network interface, the average rate of packet transfers (in and/or out) exceeded a threshold value. This rule is disabled by default; the per_netif.util rule is more useful because it considers the reported bandwidth of each network interface. However, in some situations this value is zero; in that case, an absolute threshold-based rule like this one is more useful (for this reason it should be applied to some network interfaces, but not others; use the interfaces variable to filter this). |
shping.response | Shell-ping PMDA slow application or service response | A response came from a shell-ping PMDA application or service probe |
shping.status | Shell-ping PMDA application or service probe failure | A failure occurred in a shell-ping PMDA application or service probe |
You can use the espconfig command to configure performance monitoring.
Use the following command syntax to enable performance monitoring:
/usr/sbin/espconfig -on performance
Use the following command syntax to disable performance monitoring:
/usr/sbin/espconfig -off performance
Use the following command syntax to list the current performance monitoring settings and PMIE rule settings:
/usr/sbin/espconfig -list performance [-status|-enable|-disable]
Use the -status option to list the current status (on or off) of performance monitoring on a system.
Use the -enable option to list all PMIE that are currently enabled.
Use the -disable option to list all PMIE that are currently disabled.
Use the following command syntax to enable PMIE rules:
/usr/sbin/espconfig -enable performance -pd {all|<pmie rule description>}Use the all option to enable all PMIE rules.
Use the <pmie rule description> parameter to enable specific PMIE rules.
Use the following command syntax to disable PMIE rules:
/usr/sbin/espconfig -disable performance -pd {all|<pmie rule description}>Use the all option to disable all PMIE rules.
Use the <pmie rule description> parameter to disable specific PMIE rules.
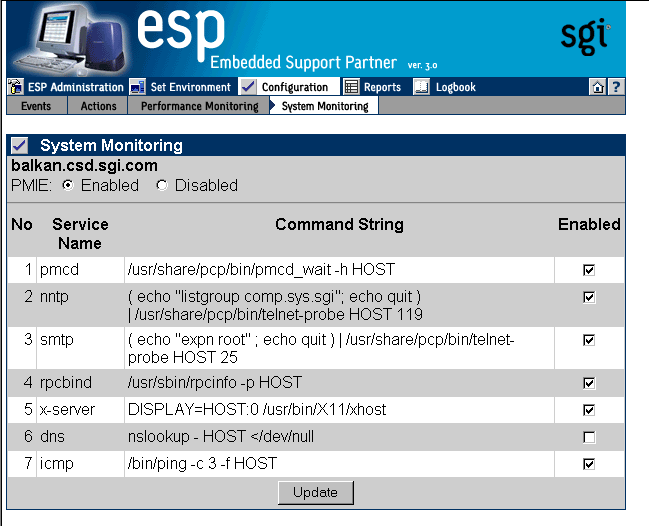
You can configure ESP to monitor ICMP, DNS, X Window System server, RPCBIND, SMTP, NNTP, and PMCD services on the local system or on other systems in a group.
ESP uses Performance Co-Pilot software tools to monitor the services and to register any events in the Embedded Support Partner database. (The events belong to the Performance class; possible events include System Group Manager service probe failure and System Group Manager slow service response.)
System monitoring is disabled by default.
Perform the following procedure to use the Web-based interface to configure system monitoring in single system manager mode:
Click on the Configuration button.
Click on the System Monitoring button.
The interface displays the System Monitoring window. (Refer to Figure 5-49.)
Click on the Enabled radio button to enable performance monitoring or click on the Disabled radio button to disable performance monitoring.
Note: This setting is also available in the Performance Monitoring window. If you change the PMIE setting in the System Monitoring window, the setting also changes in the Performance Monitoring window. Click on the Enabled checkbox for each service that you want to monitor.
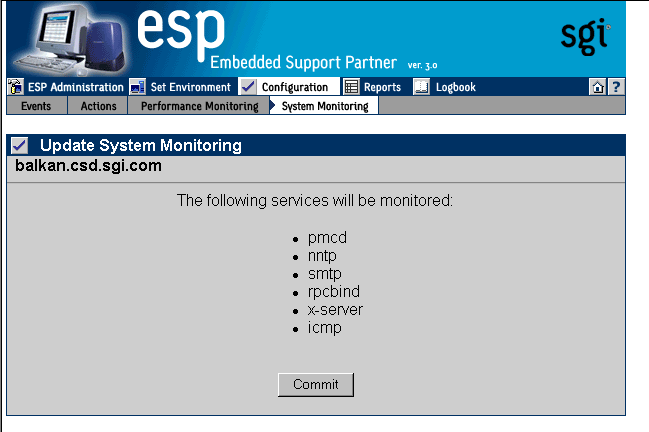
Click on the Update button.
The interface displays a verification screen. (Refer to Figure 5-50.)
Click on the Commit button.
Perform the following procedure to use the Web-based interface to configure system monitoring in system group manager mode:
Click on the Configuration button.
Click on the System Monitoring button.
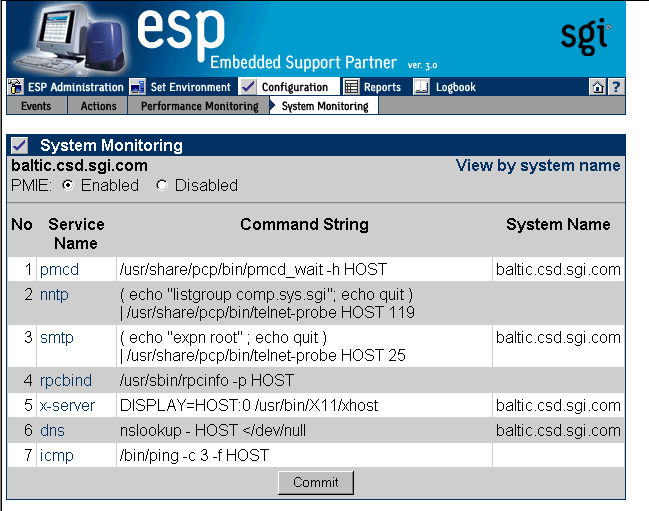
The interface displays the System Monitoring window. (Refer to Figure 5-52.)
Note: To change the performance monitoring status, click on the Enabled radio button to enable performance monitoring or click on the Disabled radio button to disable performance monitoring, and click on the Commit button. (To perform system monitoring, performance monitoring must be enabled.) Click on the name of the service that you want to monitor.
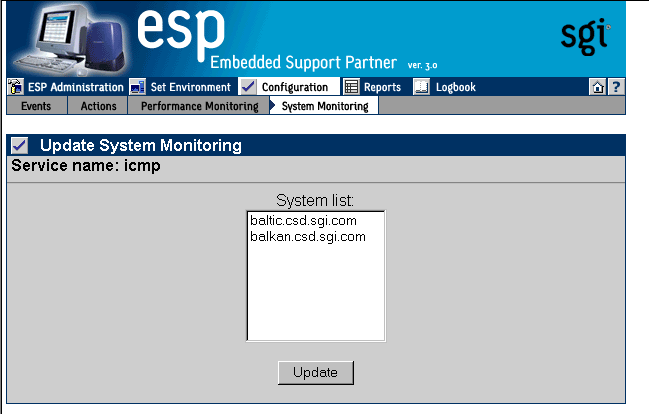
The interface displays the Update System Monitoring window. (Refer to Figure 5-53.)
Click on the systems(s) that you want to monitor.
Click on the Update button.
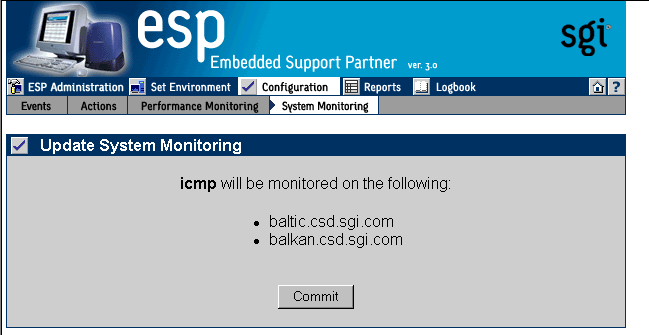
The interface displays a verification screen. (Refer to Figure 5-54.)
Click on the Commit button.
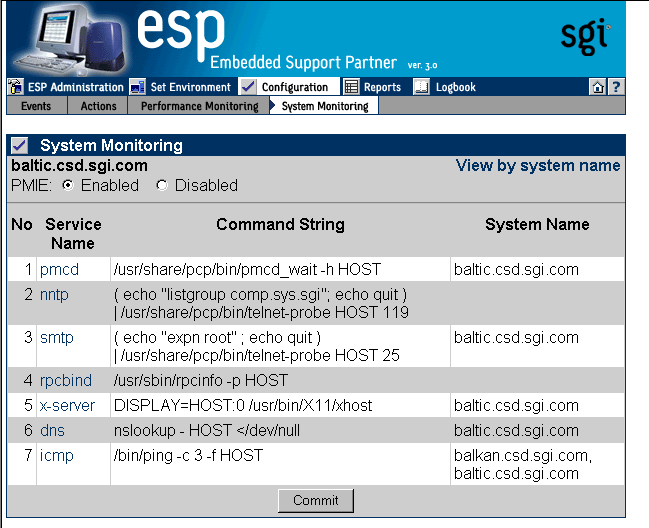
The interface displays an updated System Monitoring window. (Refer to Figure 5-55.)
You can use the espconfig command to configure system monitoring.
Use the following command syntax to list descriptions of services that are available for monitoring:
/usr/sbin/espconfig monitor -list [<service list>]
Use the <service list> parameter to specify which services to show. If you do not use the <service list> parameter, this command lists all services that are available on the system.
Use the following the command syntax to show the hosts that are being monitored for selected services:
/usr/sbin/espconfig monitor -show [<service list>] [-sgmclient <host list>]
Use the <service list> parameter to specify which services to show. If you do not use the <service list> parameter, this command lists all services that are available on the system.
Use the -sgmclient option to display services on one or more SGM clients. Use the <host list> parameter to specify the SGM clients to view.
Use the following command syntax to enable monitoring of specific services:
/usr/sbin/espconfig monitor -enable [<service list>] [-sgmclient [all|<host list>]]
Use the <service list> parameter to specify which services to show. If you do not use the <service list> parameter, this command lists all services that are available on the system.
Use the -sgmclient option to display services on one or more SGM clients. Use the all parameter to list services on all SGM clients. Use the <host list> parameter to list services on specific SGM clients.
Use the following command syntax to disable monitoring of specific services:
/usr/sbin/espconfig monitor -disable [<service list>] [-sgmclient [all|<host list>]]
Use the <service list> parameter to specify which services to stop monitoring. If you do not use the <service list> parameter, this command disables all services that are currently monitored on the system.
Use the -sgmclient option to display services on one or more SGM clients. Use the all parameter to list services on all SGM clients. Use the <host list> parameter to list services on specific SGM clients.