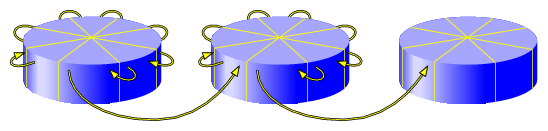
The XVM Volume Manager provides a logical organization to disk storage that enables an administrator to combine underlying physical disk storage into a single logical unit, known as a logical volume. Logical volumes behave like standard disk partitions and can be used as arguments anywhere a partition can be specified.
A logical volume allows a filesystem or raw device to be larger than the size of a physical disk. Using logical volumes can also increase disk I/O performance because a volume can be striped across more than one disk. Logical volumes can also be used to mirror data on different disks.
| Note: To use XVM under SGI ProPack 6 for Linux, you must obtain and install the appropriate LK license. For more information on LK, see the SGI ProPack 6 for Linux Service Pack 4 Start Here. The XVM Volume Manager can be used in a clustered environment with CXFS filesystems. For information on CXFS filesystems, see CXFS Administration Guide for SGI InfiniteStorage. |
This chapter provides an overview of the XVM Volume Manager and includes sections on the following topics:
The XVM Volume Manager provides all of the basic features of logical volumes that were provided with XLV logical volumes, an older logical volume design developed at SGI. These features include the following:
Self-identifying volumes
Persistent configuration and attribute information for a logical volume is distributed among all disks that are part of the logical volume. The information is stored in a label file on a disk, removing any dependence on the filesystem. Whole sets of disks can be moved within and between systems.
Multiple storage types
Logical volumes support aggregate storage through concatenation and striping. Logical volumes also support redundant storage through mirroring.
Multiple address spaces
A logical volume can support multiple mutually exclusive address spaces in the form of subvolumes. Each subvolume within a logical volume has a different usage defined by the application accessing the data. The XVM Volume Manager supports a log subvolume for separating filesystem meta-data from the data itself, a real-time subvolume for guaranteed rate I/O performance, and a data subvolume where most data, including user files, resides. (XVM on Linux does not support real-time subvolumes.)
Path failover
When a host performs an I/O operation and it fails due to connection problems, the XVM volume manager will automatically try all paths that the host has to the disk by switching (failing over) from a failing path that is being used to one of the alternate paths.
Online configuration changes
The XVM Volume Manager allows an administrator to perform certain volume reconfigurations without taking the volume offline. Volume reconfigurations that can be performed online include increasing the size of a concatenated volume and adding or removing a piece of a mirror.
In addition to the features that XLV logical volumes provide, the XVM Volume Manager provides the following significant features:
Support for a cluster environment
The XVM Volume Manager supports a cluster environment, providing an image of the XVM devices across all nodes in a cluster and allowing for administration of XVM devices from any node in the cluster. Disks within a cluster can be assigned dynamically to the entire cluster or to individual nodes within the cluster, as local volumes.
Flexible volume layering and configuration
The elements that make up an XVM logical volume can be layered in any configuration. For example, using the XVM Volume Manager, an administrator can mirror disks at any level of the logical volume configuration, or use stripe-on-stripe layering rather than a simple striped volume in situations where this results in better volume throughput.
System disks with logical volumes
Under IRIX, the XVM Volume Manager allows you to label an XVM disk so that it can be used as a system disk. This allows you to create XVM logical volumes that include the partitions of a system disk. You can mirror root partitions and you can use usr and swap partitions in any logical volume configuration.(XVM on Linux does not support labeling XVM disks as system disks.)
Support for a graphical user interface
XVM Manager Graphical User Interface (GUI) provides access to the tasks that help you set up and administer your logical volumes and provides icons representing status and structure.
Large number of slices
The layout of a disk under XVM is independent of the underlying device driver. The XVM Volume Manager determines how the disk is sliced. Because of this, the XVM Volume Manager can divide a disk into an arbitrary number of slices.
Large number of volumes
The XVM Volume Manager supports thousands of volumes on a single disk and allows for the expansion of the label file as needed. Under XVM, there are no restrictions on volume width, which is the number of volume elements that make up the widest layer of a volume.
Improved mirror performance
The XVM Volume Manager allows you to specify the read policy for an XVM mirror element, allowing you to read from the mirror in a sequential or round-robin fashion, depending on the needs of your configuration. You can also specify whether a particular leg of a mirror is to be preferred for reading.
The XVM Volume Manager also allows you to specify when a mirror does not need to be synchronized at creation, and to specify that a particular mirror, such as a mirror of a scratch filesystem, will never need to be synchronized.
Built-in statistics support
The XVM Volume Manager tracks statistics at every level of the volume tree and provides type-specific statistics. Statistics are tracked per host and interfaces are provided to Performance Co-Pilot to present a global state.
Device hot plug
A disk containing XVM logical volumes can be added to a running system and the system will be able to read the XVM configuration information without rebooting. This feature allows you to move disks between systems and to configure a new system from existing disks that contain XVM logical volumes.
Insertion and removal
The XVM administration commands provide the ability to insert and remove components from existing disk configurations, allowing you to grow and modify a disk configuration on a running system with open volumes.
Snapshot feature
Under IRIX, the XVM snapshot feature provides the ability to create virtual point-in-time images of a volume without causing a service interruption. The snapshot feature requires a minimal amount of storage because it uses a copy-on-write mechanism that copies only the data areas that change after the snapshot is created.(SGI ProPack does not currently support the snapshot feature.)
Logical volumes appear as block and character devices in subdirectories of the /dev directory.
Table 1-1 shows the directories that contain XVM logical volumes in the IRIX operating system.
Table 1-1. XVM Logical Volume Device Directories under IRIX
Device Directory | Contents |
|---|---|
Block special files for XVM logical volumes used in a CXFS cluster | |
Character special files for XVM logical volumes used in a CXFS cluster | |
Block special files for XVM logical volumes used for a host's local volume | |
Character special files for XVM logical volumes used for a host's local volume |
If you are not running in a cluster environment, all the logical volumes are considered to be local volumes unless the disk is labeled as a cluster disk or belongs to another host; in this case, it appears as a foreign disk.
The device names for XVM logical volumes in these directories are volname,subvolname where volname is the name of the XVM logical volume and subvolname is the name of the subvolume to be accessed under that volume. The directory entry will also contain a volname entry, as in the following example:
ls /dev/lxvm . .. testvol testvol,data |
For further information on XVM logical volume device directories, see “XVM Device Directories and Pathnames” in Chapter 3. For information on names of objects within XVM logical volumes, see “Object Names in XVM” in Chapter 3.
Before you create XVM logical volumes on a disk, you must label the disk as an XVM disk.In order to label a disk as an XVM disk, the disk must formatted.
Under IRIX, if your disk has not been initialized during factory set-up, use the fx(1M) command to initialize the disk as an SGI disk.
For information on formatting a disk as an SGI disk under Linux, see “Preparing to Configure XVM Volumes under Linux” in Chapter 7.
For information on using GPT disks with XVM, see “XVM Partition Layout with GPT Disk Format”.
The partition layout of a disk under XVM is described in the following sections.
When using SGI/DVH disks, the XVM Volume Manager controls the partitioning of an XVM disk. Partitions are not used to define the storage available for XVM slices, as they are for XLV logical volumes; labeling a disk as an XVM disk removes the 16-piece partition limit of an IRIX filesystem.
When you label an SGI/DVH disk as an XVM disk, you can specify whether the disk will be an XVM option disk, an XVM system disk with combined root and usr filesystems, or an XVM system disk with separate root and usr filesystems. An XVM disk is labeled as an option disk by default.
For information on labeling a disk as an XVM disk, see “Creating Physical Volumes” in Chapter 2, and “Assigning Disks to the XVM Volume Manager with the label Command” in Chapter 4. For specific information on labeling XVM disks as system disks, see “XVM System Disks” in Chapter 4.
Figure 1-1 shows the partition layout of an XVM option disk with SGI/DVH disk format. Partition 10 contains the entire disk and partition 8 contains the volume header. The remainder of the disk that is not part of partition 8 is divided into slices that you specify using the XVM Volume Manager.
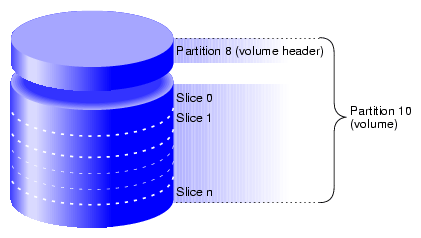
Figure 1-2 shows the partition layout of an XVM system disk with combined root and usr filesystems. Partition 8 contains the volume header, partition 9 contains the XVM label area where the information about the XVM volume elements on a disk is stored, partition 0 contains the root partition, and partition 1 contains the swap partition. Partition 10 contains the entire disk.

Figure 1-3 shows the partition layout of an XVM system disk with separate root and usr filesystems. Partition 8 contains the volume header, partition 9 contains the XVM label area where the information about the XVM volume elements on a disk is stored, partition 0 contains the root partition, partition 1 contains the swap partition, and partition 6 contains the usr partition. Partition 10 contains the entire disk. In this illustration the XVM system disk includes space on the disk that can be used for other filesystems besides root, swap and usr.

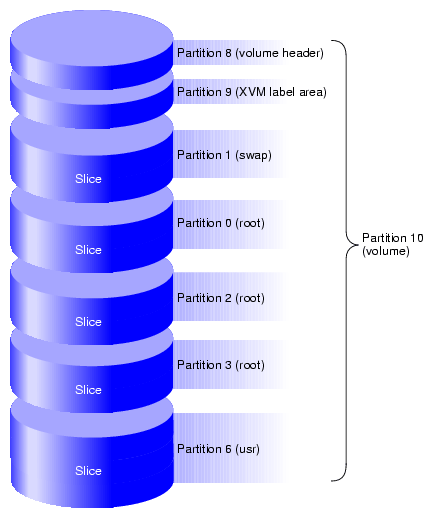
Figure 1-4 shows the partition layout of an XVM system disk with multiple root filesystems as well as a separate usr filesystem. Partition 8 contains the volume header, partition 9 contains the XVM label area where the information about the XVM volume elements on a disk is stored, partition 0 contains the first root partition, partition 1 contains the swap partition, partitions 2 and 3 contain additional root filesystems, and partition 6 contains the usr partition. Partition 10 contains the entire disk.
The XVM logical volume manager can be used with GUID partition table (GPT) disks. As with SGI/DVH disks, you must label a GPT disk as an XVM volume before you can create XVM logical volumes on the disk.
For information on labeling a disk as an XVM disk, see “Creating Physical Volumes” in Chapter 2, and “Assigning Disks to the XVM Volume Manager with the label Command” in Chapter 4.
| Note: You cannot label a GPT disk as an XVM system disk. |
You can create these labels on SGI ProPack server-capable nodes and Linux third-party clients. The GPT label puts header data in sector 1 of a LUN, leaving sector 0 for a master boot record. Partition information is stored in a variable number of sectors, starting at sector 2.
In order to use a GPT disk for XVM logical volumes, the GPT disk must be formatted with one or two partitions:
If the disk is formatted with one partition, that partition must start before block 64. It is used for both the XVM metadata and the user's data. The partition typically includes all the space on the disk not used by the GPT label.
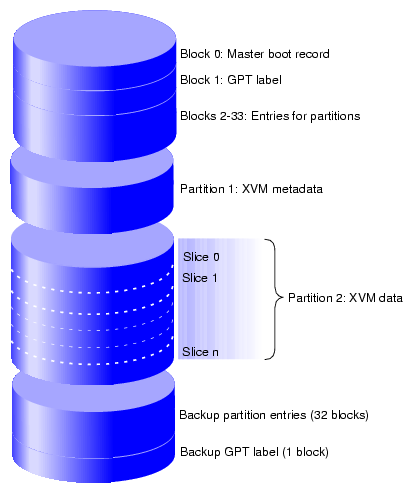
If two partitions are used, follow these guidelines:
The first partition must start before block 64 and must be at least 512KB in size.The XVM metadata (the label and slice information) will be placed in this partition.
The second paritition is typically the remainder of the disk. This is the space that XVM will slice up and use for data.
There is no advantage to using two partitions; two partitions are supported for backward compatability.
Figure 1-5 shows a GPT disk that is formatted for XVM.
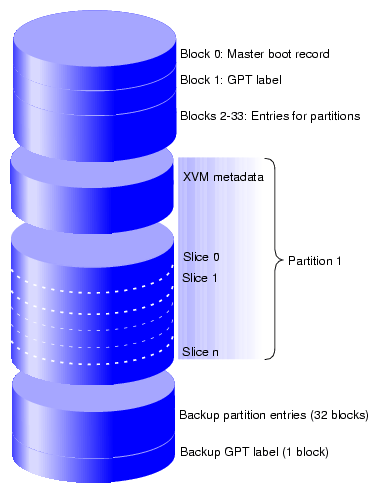
Figure 1-6 shows GPT disk layout for XVM using two partitions:
The parted(8) command is a Linux disk partitioning and partition resizing program. The following examples show how to create a GPT label on an SGI Altix system using the parted command, followed by an example using the xvm label command.
To use the parted command to create a GPT label, perform the following:
> parted /dev/xscsi/pci0002:00:02.1/node20000011c61dd850/port1/lun0/disc GNU Parted 1.6.25.1 Copyright (C) 1998 - 2005 Free Software Foundation, Inc. This program is free software, covered by the GNU General Public License. This program is distributed in the hope that it will be useful, but WITHOUT ANY WARRANTY; without even the implied warranty of MERCHANTABILITY or FITNESS FOR A PARTICULAR PURPOSE. See the GNU General Public License for more details. Using /dev/sdae (parted) mklabel gpt (parted) print Disk geometry for /dev/sdae: 0kB - 37GB Disk label type: gpt Number Start End Size File system Name Flags (parted) mkpart PRIMARY XFS 0 37GB (parted) unit s (parted) print Disk geometry for /dev/sdae: 0s - 71687371s Disk label type: gpt Number Start End Size File system Name Flags 1 34s 71687338s 71687305s (parted) quit Information: Don't forget to update /etc/fstab, if necessary. |
To write an XVM label on the GPT-labeled lun, perform the following:
> xvm label -name test1 /dev/xscsi/pci0002:00:02.1/node20000011c61dd850/port1/lun0/disc
test1
Performing automatic probe for alternate paths.
Could not probe /dev/xscsi/pci0001:00:03.0-1/target2/lun0/disc:  device has
been claimed by another user
Performing automatic path switch to preferred path for phys/test1.
phys/test1: failover: group has no preferred member

> xvm show -v phys/test1
XVM physvol phys/test1
=========================
size: 71670955 blocks  sectorsize: 512 bytes  state: online,local,accessible
uuid: a8853e23-5af5-4524-bbc9-fdd0b04ae1ec
system physvol:  no
physical drive:  /dev/xscsi/pci0002:00:02.1/node20000011c61dd850/port1/lun0/disc on host puffin
preferred path:  unspecified
available paths:
                  /dev/xscsi/pci0002:00:02.1/node20000011c61dd850/port2/lun0/disc <dev 2176> affinity=0
                  /dev/xscsi/pci0002:00:02.0/node20000011c61dd850/port2/lun0/disc <dev 16976> affinity=0
                  /dev/xscsi/pci0002:00:02.0/node20000011c61dd850/port1/lun0/disc <dev 17328> affinity=0
                  /dev/xscsi/pci0002:00:02.1/node20000011c61dd850/port1/lun0/disc <dev 16864> affinity=0 <current path>
Disk has the following XVM label:
   Clusterid:  0
   Host Name:  puffin
   Disk Name:  test1
   Magic:  0x786c6162 (balx)     Version 2
   Uuid: a8853e23-5af5-4524-bbc9-fdd0b04ae1ec
   last update:  Mon May  4 15:41:20 2009
   state: 0x91<online,local,accessible> flags: 0x0<idle>
   secbytes:  512
   label area:  8157 blocks starting at disk block 35 (0 used)
   user area:   71670955 blocks starting at disk block 8192

Physvol Usage:
Start        Length       Name
---------------------------------------------------
0            71670955     (unused)

Local stats for phys/test1 since being enabled or reset:
------------------------------------------------------------------------------
stats collection is not enabled for this physvol
|
To use the parted command to create a GPT label with two partitions, perform the following:
> parted /dev/disk/by-path/pci-0002:00:02.0-fc-0x21000011c61dd850:0x0000000000000000 GNU Parted 1.8.8 Using /dev/sdad Welcome to GNU Parted! Type 'help' to view a list of commands. (parted) mklabel gpt Warning: The existing disk label on /dev/sdad will be destroyed and all data on this disk will be lost. Do you want to continue? Yes/No? y (parted) print Model: SGI ST336753FC (scsi) Disk /dev/sdad: 36.7GB Sector size (logical/physical): 512B/512B Partition Table: gpt Number Start End Size File system Name Flags (parted) mkpart PRIMARY XFS 0 2MB (parted) mkpart PRIMARY XFS 2MB 37GB (parted) unit s (parted) print Model: SGI ST336753FC (scsi) Disk /dev/sdad: 71687372s Sector size (logical/physical): 512B/512B Partition Table: gpt Number Start End Size File system Name Flags 1 34s 3906s 3873s PRIMARY , , , , , , , , , , , 2 3907s 71687338s 71683432s PRIMARY , , , , , , , , , , , (parted) quit Information: You may need to update /etc/fstab. |
To write an XVM label on the GPT-labeled lun, perform the following:
> xvm label -name test2 /dev/disk/by-path/pci-0002:00:02.0-fc-0x21000011c61dd850:0x0000000000000000
test2
Performing automatic probe for alternate paths.
Could not probe /dev/disk/by-path/pci-0001:00:03.0-scsi-0:0:1:0:  device has
been claimed by another user
Performing automatic path switch to preferred path for phys/test2.
phys/test2: failover: group has no preferred member

>xvm show -v phys/test2
XVM physvol phys/test2
=========================
size: 71670955 blocks  sectorsize: 512 bytes  state: online,local,accessible
uuid: e59e1e61-6467-4948-9012-0eb5461c141a
system physvol:  no
physical drive:  /dev/disk/by-path/pci-0002:00:02.0-fc-0x21000011c61dd850:0x0000000000000000 on host puffin
preferred path:  unspecified
available paths:
                  /dev/disk/by-path/pci-0002:00:02.1-fc-0x22000011c61dd850:0x0000000000000000 <dev 16976> affinity=0
                  /dev/disk/by-path/pci-0002:00:02.1-fc-0x21000011c61dd850:0x0000000000000000 <dev 17328> affinity=0
                  /dev/disk/by-path/pci-0002:00:02.0-fc-0x22000011c61dd850:0x0000000000000000 <dev 2160> affinity=0
                  /dev/disk/by-path/pci-0002:00:02.0-fc-0x21000011c61dd850:0x0000000000000000 <dev 16848> affinity=0 <current path>
Disk has the following XVM label:
   Clusterid:  0
   Host Name:  puffin
   Disk Name:  test2
   Magic:  0x786c6162 (balx)     Version 2
   Uuid: e59e1e61-6467-4948-9012-0eb5461c141a
   last update:  Mon May  4 16:32:06 2009
   state: 0x91<online,local,accessible> flags: 0x0<idle>
   secbytes:  512
   label area:  8157 blocks starting at disk block 35 (0 used)
   user area:   71670955 blocks starting at disk block 8192

Physvol Usage:
Start        Length       Name
---------------------------------------------------
0            71670955     (unused)

Local stats for phys/test2 since being enabled or reset:
------------------------------------------------------------------------------
stats collection is not enabled for this physvol
|
Note that the user area does not start at the beginning of partition 2, but at the 4MB boundary. This is done to avoid writing user data into the first 4MB of the disk, which is not recommended for some raid products. The length of the user area is also shortened to avoid writing user data into the last 4MB of the disk..
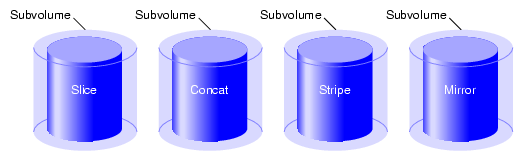
XVM logical volumes are composed of a hierarchy of logical storage objects: volumes are composed of subvolumes; subvolumes are composed of stripes, mirrors, concats (concatenated volume elements), and slices combined in whatever hierarchy suits your system needs; and, at the bottom of the hierarchy, each logical storage object is ultimately made up of slices, which define an area of physical storage. Each of these logical storage objects is known as a volume element or a ve.
The concat, stripe, and mirror logical volume elements can be arranged and stacked arbitrarily. There is a limit of ten levels from the volume through the slice, inclusive.
A logical volume element beneath another volume element in the hierarchy is known as a child or piece of the higher-level volume element. Volumes are limited to 255 children, subvolumes are limited to 1 child, and mirrors are limited to 8 children. Other volume elements are limited to 65,536 children.
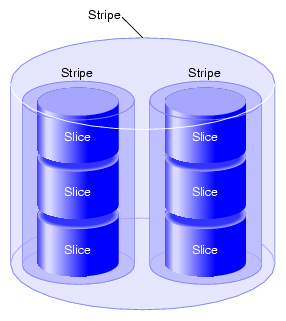
Figure 1-7 shows an example of a simple XVM logical volume. In this example, there is one data subvolume that consists of a single two-way stripe.
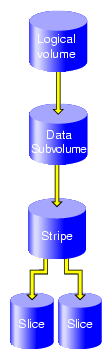
Figure 1-8 shows an XVM logical volume with three subvolumes and a mirrored stripe in the data subvolume.
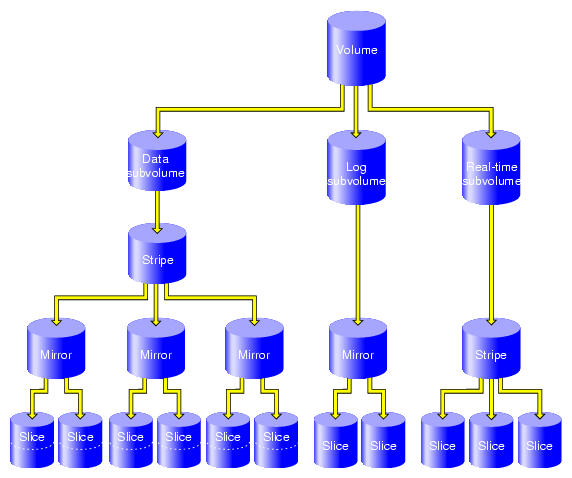
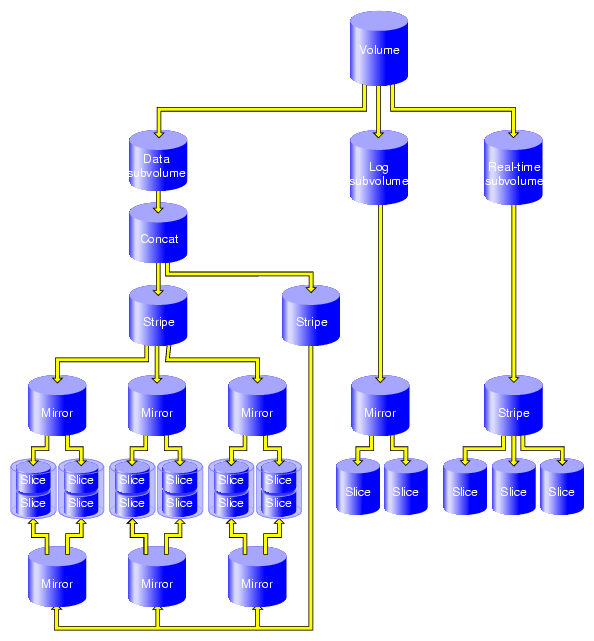
Figure 1-9 shows the example illustrated in Figure 1-8 after the insertion of a concat. In this example, additional slices were created on the unused disk space on the disks that made up the data subvolume. These slices were used to create a parallel mirrored stripe, which was combined with the existing mirrored stripe to make a concat.
The following subsections describe the XVM volume elements in greater detail.
A volume is the topmost XVM volume element. It is a collection of subvolumes, which are grouped together into a single volume name.
Each volume can be used as a single filesystem. Volume information used by the system is stored in logical volume labels in the volume header of each disk used by the volume.
You can create volumes, delete volumes, and move volumes between systems.
The subvolumes that make up a volume can be marked as data subvolumes, log subvolumes, and real-time subvolumes. These are the system-defined subvolume types, and are described in “Subvolumes”. You can also mark a subvolume as being of a user-defined type. (XVM on Linux does not support real-time subvolumes.)
You cannot have more than one subvolume of a particular system-defined subvolume type under the same volume. In other words, a volume can contain only one data subvolume, only one log subvolume, and only one real-time subvolume. This restriction does not apply to subvolumes of user-defined types.
Figure 1-10 shows an XVM volume with system-defined subvolume types.

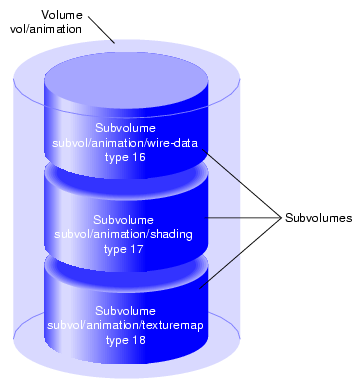
Figure 1-11 shows an XVM volume with user-defined subvolume types, which have been defined as types 16, 17, and 18. In this example, the volume is named animation and the subvolumes are named wire-data, shading, and texturemap. For information on subvolumes, see “Subvolumes”. For information on XVM object names, see “XVM Object Specification” in Chapter 3.
A subvolume is the entry point for XVM logical volume I/O. Each subvolume is a distinct address space and a distinct type. There can be only one volume element beneath a subvolume in an XVM topology.
Subvolumes can be of the following system-defined types:
System-defined subvolume types cannot have user-defined names.
A subvolume can also be marked as being of a user-defined type. You can specify a name for a subvolume of a user-defined type.
Subvolumes enforce separation among data types. For example, user data cannot overwrite filesystem log data. Subvolumes also enable filesystem data and user data to be configured to meet goals for performance and reliability. For example, performance can be improved by putting subvolumes on different disk drives.
Each subvolume can be organized independently. For example, you can mirror the log subvolume for fault tolerance and stripe the real-time subvolume across a large number of disks to give maximum throughput for video playback.
Figure 1-12 shows four examples of the composition of an XVM subvolume, showing that an XVM subvolume can contain only one child volume element.
Slices are the lowest level in the hierarchy of XVM logical volumes. Slices define physical storage; they map address space of a physical disk onto a volume element.
A concat is an XVM volume element that combines other volume elements so that their storage is combined into one logical unit. For example, two slices can be combined into a single concat.
Figure 1-13 shows a concat that is composed of two slices.
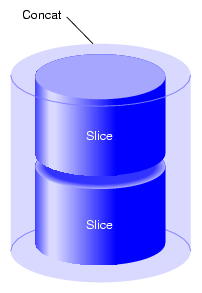
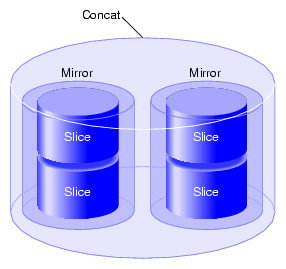
Figure 1-14 shows a concat that is composed of two mirrors.
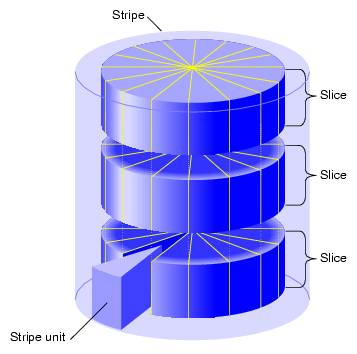
A stripe is an XVM volume element that consists of two or more underlying volume elements. These elements are organized so that an amount of data called the stripe unit is written to and read in from each underlying volume element in a round-robin fashion.
Striping can be used to alternate sections of data among multiple disks. This provides a performance advantage by allowing parallel I/O activity.
Figure 1-15 shows a three-way stripe.
A stripe configured on top of another stripe may provide performance benefits over a single wider stripe. In Figure 1-16, two three-way stripes are created and then striped again using a larger stripe unit size. If configured correctly, disjoint sequential access (where different processes are doing sequential I/O to different parts of the address space) will end up on different halves of the top-level stripe. The advantage of this configuration is that for parallel large accesses, the two halves of the top-level stripe can operate independently, whereas with a single six-way stripe, multiple I/O operations would be outstanding to each disk, causing the need for a disk seek.
A mirror is an XVM volume element that maintains identical data images on its underlying volume elements. This data redundancy increases system reliability. The components of a mirror do not have to be identical in size, but if they are not there will be unused space in the larger components.
| Note: To use the mirroring feature of the XVM Volume Manager or to access a mirrored volume from a given node in a cluster, you must purchase install the appropriate FLEXlm license on IRIX or LK license on SGI ProPack 6 for Linux. |
Figure 1-17 shows a mirror that is composed of two slices.
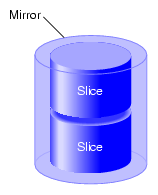
Figure 1-18 shows a mirror that is composed of two stripes.
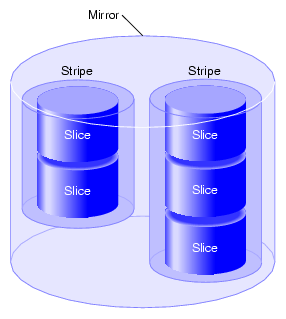
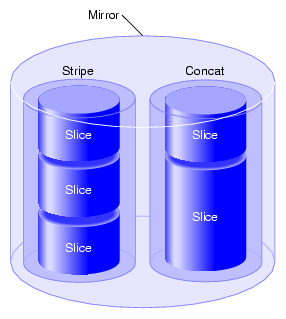
Figure 1-19 shows a mirror composed of a stripe and a concat.
A logical volume can include slices from several physical disk drives. If the logical volume is not striped, data is written to the first component of a volume element until that component is full, then to the second component, and so on. Figure 1-20 shows the order in which data is written to a concatenated logical volume. In this figure, each wedge represents a unit of data that is written to disk. Data is written to the first component until it is filled, and then data is written to the second component until it is filled, and so forth.
If the logical volume is striped, an amount of data called the stripe unit is written to each underlying volume element in a round-robin fashion. Figure 1-21 shows the order in which data is written to a striped volume element with a three-way stripe. Each wedge represents a stripe unit of data. One stripe unit of data is written to the first component of the stripe, then one stripe unit of data is written to the second component of the stripe, then one stripe unit of data is written to the third component of the stripe. After this, the next stripe unit of data is written to the first component, and so forth.
As an example of configuring stripes to improve performance, consider a situation where your typical I/O activity is 2MB in size and you have 4 disks. If the disks are concated, the I/O will all go to one disk. If the 4 disks are striped with a stripe unit of 512KB, then a 2MB I/O activity will use all four disks in parallel, each supplying 512KB of data. You should be able to get the best performance by making your stripe width (the stripe unit times the number of disks) equal to the I/O size that is most common.
If the LUNs you are striping are RAID devices, then it is also advantageous to have your XVM stripes line up on and be a multiple of the RAID stripe boundaries. This will not only allow all your XVM luns to transfer in parallel, but all the disks in the RAID will be accessed in parallel, in units of the same size.
The XVM Volume Manager is used by CXFS filesystems, which are shared among the nodes in a CXFS cluster.Because of this, an XVM physical volume has a domain, which can be cluster or local. An XVM physical volume with a cluster domain is owned by a CXFS cluster, while an XVM physical volume with a local domain is owned by a single node.
An XVM physical volume that has a cluster domain can be configured and modified by any node in the CXFS cluster that owns it. An XVM physical volume that has a local domain can be configured and modified only by the local node that owns it. The XVM logical volumes that are contained on XVM physical volumes with a local domain are considered to be local volumes.
For information on XVM domains, see “XVM Domains” in Chapter 2. For information on CXFS, see CXFS Version 2 Software Installation and Administration Guide.
If your XVM configuration requires that you spread I/O across controllers, you must define a complete failover configuration file.This is necessary to ensure that I/O is restricted to the path that you select.For example, if you want a striped volume to span two host bus adapters, you must configure a failover configuration file to specify the preferred paths.
There are two failover mechanisms that XVM uses to select the preferred I/O path, each with its associated failover configuration file:
Failover version 1 (V1), which uses the failover.conf configuration file
Failover version 2 (V2)which uses the failover2.conf configuration file
XVM failover is described in Chapter 5, “XVM Failover”.
If you are running the “f” release leg of the IRIX operating system, you can use the XVM Volume Manager as a standalone volume manager, a separate product from CXFS.
| Note: If you will be using the mirroring feature of XVM under IRIX, you must obtain and install the XFS Volume Plexing option, which requires a FLEXlm license. Contact SGI or your local service provider for information on obtaining and installing this license. |
To use XVM as a standalone product under IRIX, you will need to specify that the eoe.sw.xvm module is installed when you install your system. This module is not installed by default.
If you are already running the “f” release leg of IRIX and wish to add support for running XVM as a standalone volume manager, use the following procedure:
To ensure that you are running IRIX 6.5.Xf, use the following command to display the currently installed system:
# uname -aR
IRIX 6.5.Xm does not support XVM as a standalone volume manager.
Insert CD-ROM #2 into the CD drive.
Instruct inst to read the already inserted CD-ROM as follows:
# inst
Inst> from /CDROM/dist

Caution: Do not install to an alternate root using the inst -r option. Some of the exit operations (exitops) do not use pathnames relative to the alternate root, which can result in problems on both the main and alternate root filesystem if you use the -r option. For more information about exitops, see the inst(1M) man page. Press <ENTER> to read the CD-ROM:
Install software from : [/CDROM/dist] <ENTER>
Install the XVM module:
Inst> keep *
Inst> install eoe.sw.xvm
Exit from inst:
Inst> quit
The requickstarting process may take a few minutes to complete.
After you have installed the software and you have quit the inst interface, you are prompted to reboot the system and apply the changes.