| Note: SGI ProPack 7 for Linux Service Pack 1 (SP1) requires the SGI Foundation Software 2 Service Pack 1 (SP1) release. For more information, see the SGI Foundation Software 2 Start Here available at http://docs.sgi.com . |
This chapter describes the planning that you need to do to get started and provides instructions for installing SGI ProPack 7 SP1.
Your SGI Altix system comes with a base Linux distribution of SUSE Linux Enterprise Server 11 (SLES11) Service Pack 1 (SP1) and the SGI ProPack 7 for Linux SP1 software preinstalled. This chapter describes how to install the software from the CD if it should ever become necessary to reinstall it.
| Note: For information on how to install, configure, and operate or update software on an SGI Altix ICE series system, see the SGI Tempo System Administrator's Guide available at http://docs.sgi.com . |
For security reasons, Linux requires a root password for login. The default password for your preinstalled software is sgisgi. After you have logged in, change this root password to a string of your own choice.
The SGI ProPack 7 for Linux SP1 software works only with the SLES 11 SP1 environment. Earlier versions of these distributions, or any other distributions, are not compatible with SGI ProPack 7 for Linux SP1 software.
Before you install or configure your system, please read Chapter 1, “Release Features” so that you understand the features of SGI ProPack 7 SP1 software. You might also want to familiarize yourself with some or all of the documentation listed in “Related Publications”.
This chapter covers the following topics:
This section provides disk and file information you need to have about the software that has been shipped to you and covers the following topics:
SGI ships Altix systems with Itanium processors from the factory running SGI ProPack 7 SP1 with SLES11 SP1 with the partition layout as shown in Table 2-1
Table 2-1. Disk Partitions for Itanium Systems with ProPack 7 SP1 and SLES11 SP1
Partition | Type | Mount Point | Size |
|---|---|---|---|
part1 | VFAT | /boot/efi | 500 MB |
part2 | XFS | / | 100 GB |
part3 | /swap | /swap | 10 GB |
part4 | XFS | /data1 | remainder of disk |
SGI ships Altix XE systems with Xeon processors from the factory running SGI ProPack 7 with SLES11 with the partition layout shown in Table 2-2.
Table 2-2. Disk Partitions for x86_x64 Systems with ProPack 7 and SLES11
Partition | Type | Mount Point | Size |
|---|---|---|---|
part1 | ext3 | /boot | 100 GB |
part2 | XFS | / | 100 GB |
part3 | SWAP | /swap | 10 GB |
part4 |
|
| remainder of disk with filesystem mounted as /data1 |
When doing a network installation on a system with multiple Ethernet interfaces, there is no guarantee about initial interface names. The first interface discovered will be named "eth0", and so on. This can make network installations confusing. If this is a problem, a workaround is to remove the Ethernet cards that are not being used to install software over the network. Once the installation is complete, the Ethernet cards can be reinstalled. A persistent naming mechanism ensures that an interface, once named, retains its name across system reboots.
You cannot access XVM Volumes in Rescue Mode on SGI ProPack 7 SP1 systems. It is possible to boot into rescue mode from the SLES 11 SP1 DVD, but that DVD does not contain the xvm kernel module. This makes it is impossible to perform maintenance on XVM volumes from rescue mode at this time. SGI recommends that you do not migrate any system directories to XVM since there is no way to access them from rescue mode.
You need to add xfs_quota to the INITRD_MODULES variable in the /etc/sysconfig/kernel file when rootflags=quota is set or the initrd boot loader will panic your system at boot time.
For ia64 systems, SLES11 SP1 contains two kernel variants, kernel-default and kernel-debug. During installation, if you do not explicitly select to install kernel-debug, your SGI Altix system will boot with the kernel-default variant after installation. Both the kdb/lkcd and kexec/kdump crash dump facilities are compatible with this default kernel.
For x86_64 systems, SLES11 SP1 contains kernel-default and kernel-xen. The kernel-default variant provides multi-processor support.
The two methods for getting crash dumps are, as follows:
kdb/lkcd for SLES11 SP1 on Altix 4000 series systems
kexec/kdump for SLES11 SP1 on Altix XE, Altix UV, and Altix ICE systems
This section describes these two methods.
In the event of a system crash on SGI Altix 3000 and 4000 series systems running SGI ProPack 7 SP1, the Linux Kernel Crash Dump (LKCD) facility will save a crash dump that will appear in the /var/log/dump directory after your system reboots. SGI support personnel can analyze this file to determine the cause of the system crash.
If you wish to save crash dumps to a different location, edit the DUMPDIR variable in /etc/sysconfig/dump and then run the following command: lkcd config.
| Note: Depending on which kernel you have installed, the system may enter the KDB kernel debugger after a crash. If a kdb> prompt appears on the console, type sr d to initiate a crash dump. |
In the event of a system crash on Altix XE, and Altix ICE systems running SGI ProPack 7 SP1 running SLES11 SP1, the system uses the kexec/kdump crash dump utility. The kexec/kdump utility creates a Linux kernel crash dump at /var/crash/timestamp/vmcore if kexec/kdump is installed, enabled, and configured. After SGI ProPack 7 SP1 is installed, your system is set up to take dumps when needed. In order to analyze a crash dump, you need the debuginfo packages installed. For more information, see the SGI ProPack 7 SP1 release notes.
| Note: For the SGI ProPack 7 SP 1 release, kexec/kdump crash dump utility is not currently supported on SGI Altix UV1000 or Altix UV 100 systems. The SLES11 SP1 release supports the kdb utility. You can use archkdb commands to provide useful information after a system crashes or hangs. Nonmaskable interrupts (NMIs) also work and get the system into kdb. For more information, see “LKCD Crash Dump Facility”. |
| Note: This section only applies to ia64 systems. For x86_64 systems, see “Getting the Latest Firmware/Software for Your SGI Altix XE System”. |
Unless you have the most current PROM, the kernel may fail to boot during the installation procedure. The PROM version is printed when the system resets in the PROM banner.
The PROM RPM is now part of the SGI Foundation Software 2 SP1 release. For more information, see the SGI Foundation Software 2 Service Pack 2 Start Here.
| Note: SGI Altix 450 or SGI Altix 4700 systems running SGI ProPack 7 for Linux should use the PROM located in shub2snprom.bin. The System Controller 1.22 release provides a sys_ctrl-ProPackICE_1.22.tar file that installs onto an SGI Altix ICE 8200 system to service an Altix 450 that provides NAS support. All other SGI systems should use the PROM located in shub1snprom.bin. This note does not apply to SGI Altix XE systems (instead see “Getting the Latest Firmware/Software for Your SGI Altix XE System”). Software support contract customers can download the most recent PROM versions from SGI Supportfolio: https://support.sgi.com/ |
For legacy SGI systems, you can determine the PROM level installed on your machine, as follows:
% cat /proc/sgi_prominfo/node*/version 5.00 SGI SAL Version 5.00 rel080415 IP41 built 06:31:53 AM Apr 15, 2008 |
On an SGI Altix 4700 system, the output from the version file looks similar to the following:
% cat /proc/sgi_prominfo/node*/version 1.40 SGI SAL Version 1.40 rel071217 IP65 built 06:08:32 AM Dec 17, 2007 |
The PROM RPM on the SGI Foundation Software 2 CD contains all of the appropriate flash images for SGI systems running SGI ProPack 7. The flash utility chooses the appropriate image for your machine from this RPM.
For information on the latest firmware for you Altix XE system, see the SGI Foundation Software 2 Service Pack 1 Start Here available at http://docs.sgi.com .
For information on the latest BIOS for you SGI Altix UV 1000 or SGI Altix UV 100 system, see the SGI Foundation Software 2 Service Pack 1 Start Here available at http://docs.sgi.com .
| Important: Please backup your license key files prior to installing SLES11 SP1 and/or SGI ProPack 7 SP1. A license key file is not included in these RPMs. |
Your original license key files will need to be restored after you complete your installation.
In terms of software licensing support, the USE distributors do not ship any code. ISVs are responsible for obtaining and including software licensing components into their products.
For information on the SGI software licensing mechanism called LK and, new for this release, LK floating licenses facilities, see the SGI Foundation Software 2 Service Pack 1 Start Here available at http://docs.sgi.com .
This section provides an overview of installing SLES 11 SP1 on your SGI system.
| Note: For information on how to install, configure, and operate software on an SGI Altix ICE 8200 system, see the SGI Tempo System Administrator's Guide available at http://docs.sgi.com . |
This section provides some information about installing SLES11 SP1 on SGI Altix systems. You need to have SLES11 installed before you can install SGI ProPack 7 for Linux.
For installation instructions, see “Installing SLES11 SP1 and SGI ProPack 7SP1”.
In general, the documentation that comes with SUSE applies to installing software on an SGI Altix system. This section provides some notes to get you started, as follows:
| Note: Please read all the notes below before attempting installation. |
Find installation documentation.
You can find installation documentation on the SLES11 SP1 DVD in the docu/en directory. It contains these .pdf documentation files:
installquick.pdf deployment.pdf admin.pdf storage.pdf
Find and read the SLES11 SP1 release notes.
It is important to read the SLES11SP1 release notes as well. You will find them in a text file named RELEASE-NOTES.en.txt in the root directory of the SLES 11 SP1 DVD. The YaST installation tool can also get the latest version of the release notes directly from Novell. On the installed system, the latest version of the release notes are at the following location:
/usr/share/doc/release-notes/SUSE_Linux_Enterprise_Server_11/RELEASE-NOTES.en.html
How to erase everything and start with a clean root drive.
By default, the YaST installer does not allow you to remove older partitions and create a clean root. To do so, you must run the YaST Partitioner in “Expert Mode” The default filesystem type for partitions is reiserfs. To create partitions with the XFS filesystem type, manually “Edit” the partition and then select XFS. Boot partitions on SGI Altix 450 or 4000 series systems should always use the FAT filesystem.
Find the best installation method for SLES11 SP1 for your site.
There are several different methods to install SLES11 SP1. To use the graphical YaST installation, SGI recommends using the vnc or ssh methods, assuming the SGI system is connected to a network.
Insert the media in the DVD drive and reset the machine. The BIOS on x86_64 systems should already be configured to attempt booting from CD first. The SLES11 SP1 media should boot when the system comes back up.
To use this mode on ia64 systems, SGI suggests the EFI Shell [Built-in] from the Boot Maintenance menu. A list of fs# devices will be presented before you get to the Shell> prompt. One from the list, will have the word CDROM in the display. If the fs# associated with the CDROM is 1, enter the following commands:
Shell> fs1:
fs1:\> cd efi\boot
You are now ready to launch the installer. Issue the following command:
fs1:\efi\boot> bootia64
You now will see a list of choices including Installation, Installation - Safe Settings, and so on. Keep the default Installation choice highlighted. In the boot: prompt, your selection depends on the type of system you are booting.
If you prefer to install using vnc or ssh, enter vnc=1 or usessh=1 in the Boot: line.
If you are installing software on an Altix system you need to specify information about the serial console on the boot line. If you wish to use vnc or ssh, you can supply those options as well. An example boot line specifying the serial console for installation and the use of vnc is similar to the following:
For ia64:
boot: console=ttySG0,38400n8 vnc=1
For x86_64:
If you are using a VGA monitor/keyboard to install, you do not need to supply any options.
If you are using a serial console, the setting depends on how the system is configured. An example is, as follows:
boot: console=ttyS1,38400n8 vnc=1

Note: If ttyS1 does not work, try ttyS0. The serial cable might be attached to the other serial port For ia64 systems, if you choose to install over the serial console or an L2 controller with xterm, note that the serial console may not be 100% clean and that you may run into "screen corruption". Often this can be cleared up by entering Ctrl-L from the command line, which re-draws the screen. When using xterm, remember to set the encoding to UTF-8. The following command line options have yielded fairly good results:
xterm -sb -en UTF-8 -geometry 130x40 -e "cu -s 38400 -l /dev/ttySG0"
Find out how to perform a network installation.
If you plan to set up a system to do network installations, you may find the “Network Install Server Setup” in this document helpful. This section describes how to integrate SGI ProPack 7 SP1 with SUSE operating system repositories.
Find information on AutoYaST.
For information on AutoYaST, see “Using AutoYaST”.
| Note: SGI ProPack 7 for Linux Service Pack 1 requires the SGI Foundation Software 2 Service Pack 1 release. For more information, see the SGI Foundation Software 2 Service Pack 1 Start Here available at http://docs.sgi.com . |
To install SUSE Linux Enterprise Server 11 (SLES11) SP1 from the DVD media, perform the procedures described in this section.
| Note: Before starting a fresh install of SLES11 SP1 and SGI ProPack 7 SP1 over the existing operating system, it is a good idea to remove the production root drive from your system. Perform the fresh install over the operating system on your backup root drive. This provides a fall back route to your previous operating system, in case of application compatibility issues. |
For SLES11 SP1, see the see the SUSE Linux Enterprise Server 11 Installation Quick Start (installquick.pdf) in the the /docu/en directory and proceed to “Installation Procedure for SLES11 SP1 ”.
If you suspect that a YaST session is hung during installation of SGI software products, run the following command and check the time stamps of the latest log entries against the system time:
$ tail -n3 /var/log/YaST2/y2log 2009-03-25 09:04:00 <0> ia64sys2(3655) [solver] Resolver.cc(show_pool):1069 2367: U_Ts_[S1:1][package]mysql-shared-5.0.26-12.18.ia64 2009-03-25 09:04:00 <0> ia64sys2(3655) [solver] Resolver.cc(show_pool):1069 2949: U_Ts_[S1:1][package]sysstat-8.0.4-1.4.ia64 2009-03-25 09:04:00 <1> ia64sys2(3655) [qt-ui] YQUI_builtins.cc(runPkgSelection):92 Running package selection... |
As YaST works, it logs time stamped messages into the y2log file. Comparing the time stamp of the last logged action against current system time can help provide additional data upon which you may base a decision concerning whether a YaST session is still actively running or not.
Documentation for SUSE Linux Enterprise Server 11 SP1 is located on your system in the /docu/en directory.
| Note: For an overview of SLES11 SP1 installation, see the SUSE Linux Enterprise Server 11 Installation Quick Start (installquick.pdf). This document provides a quick overview of how to run through the default installation of SLES walking you through a number of installation screens. For detailed installation instructions, see the SUSE Linux Enterprise Server 11 Deployment Guide (deployment.pdf). |
There are a number of ways to install SGI ProPack 7 SP1 on top of the SUSE Linux Enterprise Server 11 (SLES11) Service Pack 1 (SP1) operating system. One method is to install it at the same time as you install SLES11 SP1. Another method is to install SGI ProPack 7 SP1 after SLES11 SP1 has been completely installed. The two procedures are quite similar and are described in this section, as follows:
To install SLES11 SP1 and SGI ProPack 7 SP1 from the DVD media, perform the following steps:
Insert the SLES 11 SP1 Installation DVD in the DVD drive and reboot your system.
Follow the steps in the USE Linux Enterprise Server 11 Installation Quick Start.
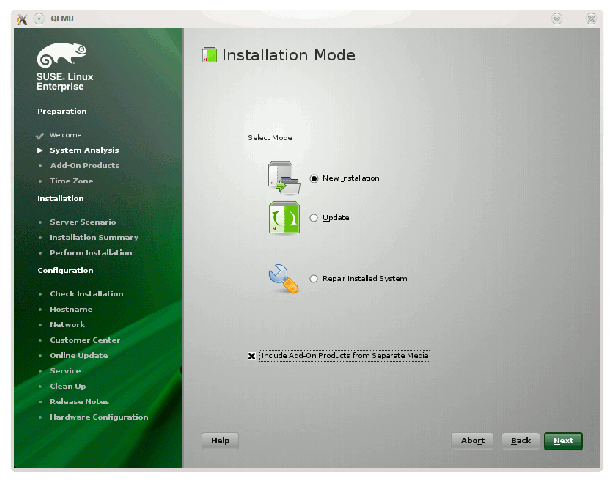
When you get to the Installation Mode screen as shown in Figure 2-1, click the button next to Include Add-On Products from Separate Media and then click Next to continue.
Because SGI ProPack 7 SP1 is dependent on SGI Foundation Software 2 SP1, you should add it first and then SGI ProPack 7 SP1. For information on add-on products, see chapter 10, “Installing Add-On Products” ins the SUSE Linux Enterprise Server 11 Deployment Guide. You can also see the SGI Foundation Software 2 Service Pack 1 Start Here for installation instructions.
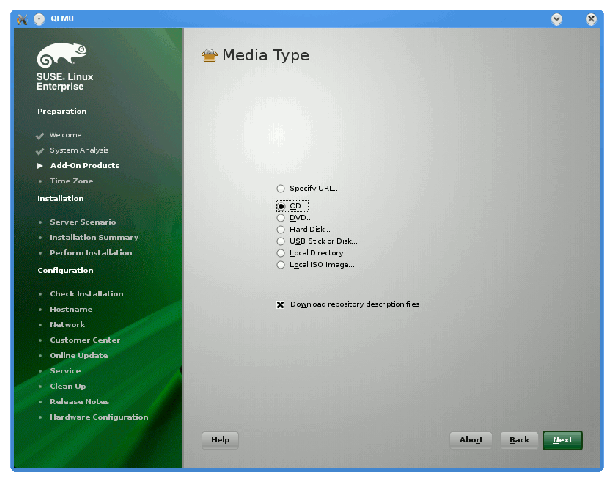
From the Media Type screen shown in Figure 2-2, click the button to the left of CD.
The Insert the add-on product CD dialog box appears. Insert the SGI -Foundation-x86_64 CD into the drive and click the Continue button and then Next to proceed.
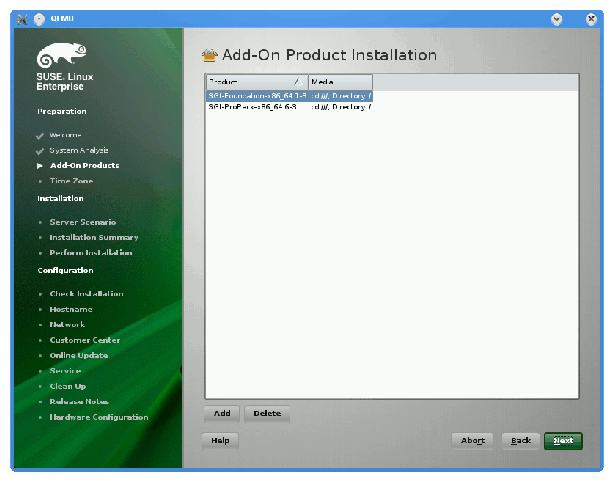
From the Add-On Product Installation screen as shown in Figure 2-3, click on SGI-Foundation-x86_64 1-3 cd:///.Directory and click the Add button and then Next to proceed.
Repeat steps 3 through 6 to add SGI ProPack 7 SP1 for Linux as an add-on product. Eject the SGI Foundation 2 SP1 CD and replace it with the SGI ProPack 7 for Linux Service Pack 1 CD. From the Add-On Product Installation screen as shown in Figure 2-4, click on SGI-ProPack-x86_64 6-4 cd:///Directory click the Add button and then Next to proceed.
Follow the SLES11 SP1 instructions to complete the installation.

Because SGI ProPack 7 SP1 is dependent on SGI Foundation Software 2 SP1, you should add it first and then SGI ProPack 7 SP1. For information on add-on products, see chapter 10, “Installing Add-On Products” ins the SUSE Linux Enterprise Server 11 Deployment Guide. You can also see the SGI Foundation Software 2 Service Pack 1 Start Here for installation instructions for SGI Foundation 2 SP1 software on a previously installed SLES11 SP1 system.
To install SGI ProPack 7 SP1 on a previously installed SLES11 SP1 system, perform the following steps:
Start the graphical (yast2) version of the YaST install tool.
Under the Software section, choose Add-On Products.
From the Add-On Product Installation screen, press the Add button on the bottom left side.
The Media Type screen appears, as shown in Figure 2-2. Insert the SGI ProPack 7 Service Pack 1 CD into the drive and press the Continue button and then the Next button to proceed.
Enter you SGI SupportFolio login and password. This will enable you to set up an install source for software updates from SGI ProPack 7 SP1.
If you wish to simply install suggested defaults, simply press Accept in the screen that lists available patterns. The software will then be installed.
This section describes how to set up a network install server and provides some information on using AutoYaST. It covers these topics:
This section provides you with some information on installing SLES11 SP1 and SGI ProPack 7 SP1 all in one session over the network. This is helpful for systems administrators who have several machines to install and keep up to date.
| Note: For information on setting up a network install server, see the “Installing Add-On Products” section in Chapter 7, “System Configuration with Yast” in the SUSE Linux Enterprise Server Installation and Administration manual that resides in the sles-admin.pdf file in the docu directory of the SLES11 DVD and see “Chapter 4. Configuration and Installation Options” in AutoYaST available at http://www.suse.de/~ug/autoyast_doc/index.html. |
In SLES11 SP1, you can create a special add_on_products file that directs YaST to look at additional install sources. You may list a URL to the SGI ProPack 7 SP1 install source in this file.
To create an SGI ProPack 7 SP1 install source, you simply mount the SGI ProPack 7 for Linux Service Pack 1 CD and copy all of the contents in to a repository. An example of how to do this is, as follows:
mkdir /path/to/new-propack-repository mount /dev/cdrom /mnt cp -a /mnt/* /path/to/new-propack-repository/ umount /mnt |
In the add_on_products file that exists in your SLES11 network repository, you just add a URL pointer to your new target. The URL can be nfs, http, ftp, and so. An example entry for the add_on_products file is similar to the following:
nfs://server/path/to/new-propack-repository |
AutoYaST is a tool that allows you to install and configure a system based on control file settings. With AutoYaST, you could install and configure a system over the network automatically.
You can find information on how to use AutoYaST in AutoYaST available at http://www.suse.de/~ug/autoyast_doc/index.html.
You can find information about AutoYaST in Chapter 5, “Automated Installation”, of the SUSE Linux Enterprise Server Installation and Administration manual. This resides in the sles-admin.pdf file in the /docu/en directory of the SLES 11 DVD. Documentation is also available in /usr/share/doc/packages/autoyast2/html/index.html on systems running SLES11 SP1.
This section describes how to upgrade from a prior release. It covers the following topics:
| Note: The best way to upgrade a system that is running a previous SLES and ProPack release is to install both SLES11 SP1 and SGI ProPack 7 SP1 at the same time (see “Installing SLES11 SP1 and SGI ProPack 7SP1”). If SLES11 is already installed on your system, see “Install SGI ProPack 7 SP1 on a Previously Installed SLES11 SP1 System”. |
Updates are supported starting from one of the following bases:
SLES 9 GA (no Service Pack)
SLES 9 SP3
SLES 9 SP4
SLES 10 GA (no Service Pack)
SLES 10 SP1
SLES 10 SP2
SLES 10 SP3
SLES 11
Note: Update a system by starting the SLES11 installation system and choosing Update instead of New Installation.
This section describes how to upgrade your SLES 10 SPx system running the SGI ProPack 6 SP6 release (or earlier) to SGI ProPack 7 SP1 on SLES11 SP1.
During this upgrade, your kernel and several other packages may be upgraded to a SLES 11 Online Update version. If you have been keeping up-to-date with SLES11 online updates, you may already have the newer updated packages installed. The upgrade will work fine in either case.
| Caution: Do not use System Update to update SGI ProPack. The SLES 11 version of System Update is not currently supported by SUSE and will not work correctly. |
You need to pay careful attention to the upgrade instructions. If you simply were to mark a pattern for upgrade, you will find only a few packages would be installed. You need to work around a problem in YaST to get the install to proceed properly.
SGI suggests that existing customers upgrade their system from SGI ProPack 5 SPx or SGI ProPack 6 SPx to SGI ProPack 7 SP1 using media because this ensures you get new packages for SGI ProPack 7 SP1. A simple online-update will not automatically offer new packages.
To upgrade from SGI ProPack 5 SPx or SGI ProPack 6 SPx to SGI ProPack 7 SP1, perform the following steps:
Remove any old SGI ProPack 5 SPx or SGI ProPack 6 SPx install source that may be present. There are several ways to do this. The following example uses the yast command.
Start the graphical or text version of yast.
Select Software -> Installation Source.
Check for an install source named SGI ProPack 7 for Linux or any install source corresponding to an older release of SGI ProPack.
If the SGI ProPack 7 install source exists, select it and delete it.
Select Finish to exit out of the tool.
Add ProPack 7 SP1 add-on product, as follows:
Start the graphical or text version of yast.
Select Software -> Add-on Product.
Note: At this point, you need to select and define your media. This example shows the use of a physical CD. Select CD....
You will be prompted to insert the media.
YaST will now add the install source for you.
Note: You will see an error message that states: "An error occurred while connecting to the server. Details: Cannot create the installation source Try again?" This does NOT mean the add-on product failed to add. Instead, this is giving you a chance to enter your authentication information for getting updates/patches from SGI.
Answer Yes to the re-try question.
You are now given a chance to set up authentication details
Unselect the Anonymous box.
Enter your SupportFolio login name for User name.
Enter your SupportFolio password for Password.
YaST will now add the update source in addition to the ProPack 7 install source itself.
You are now software manager. Perform the following steps:
Select Filter and then Patterns.

Caution: At this point, do not mark the patterns themselves for upgrade. That will cause the upgrade to not complete properly. See the introductory comments to this section (“Upgrading From SGI ProPack 5 SPx or SGI ProPack 6 SPx to SGI Propack 7 SP1”). In Text mode, perform the following:
Highlight the SGI ProPack pattern and select OK.
Highlight one of the packages that are part of this pattern (any one will do).
Tab to Actions and hit Enter.
Select All Listed Packages...
Select Update All Unconditionally
Now all the packages in this pattern should have '>' next to them.
In Graphical mode, perform the following:
Highlight the SGI ProPack pattern and right-click on any package in the list.
Select All In List and then Update if newer version available
If you have additional SGI ProPack or REACT patterns to update, go to the Caution in step 3a. and repeat the steps for each additional pattern.
Select Accept to install.
Your system will now be updated.