
Intel® Cluster Toolkit Compiler Edition 4.0 for Linux* OS
Installation Guide
Copyright © 2007–2010 Intel Corporation
All Rights Reserved
Document Number: 318535-006
Revision: 20100602
World Wide Web: http://www.intel.com
Disclaimer and Legal Information
2................... Intel Software Downloads and Installation on Linux* OS
3................... Uninstalling the Intel® Cluster Toolkit Compiler Edition on Linux* OS
4................... Hardware Recommendations for Installation on Linux* OS
5................... System Administrator Checklist for Linux* OS.
6................... User Checklist for Linux* OS
Revision History
|
Document Number |
Revision Number |
Description |
Revision Date |
|
318535-006 |
20100602 |
Updated Intel® Cluster Toolkit Compiler Edition 4.0 for Linux* OS Installation Guide to reflect changes and improvements to the software components. |
06/02/2010 |
Disclaimer and Legal Information
INFORMATION IN THIS DOCUMENT IS PROVIDED IN CONNECTION WITH INTEL® PRODUCTS. NO LICENSE, EXPRESS OR IMPLIED, BY ESTOPPEL OR OTHERWISE, TO ANY INTELLECTUAL PROPERTY RIGHTS IS GRANTED BY THIS DOCUMENT. EXCEPT AS PROVIDED IN INTEL'S TERMS AND CONDITIONS OF SALE FOR SUCH PRODUCTS, INTEL ASSUMES NO LIABILITY WHATSOEVER, AND INTEL DISCLAIMS ANY EXPRESS OR IMPLIED WARRANTY, RELATING TO SALE AND/OR USE OF INTEL PRODUCTS INCLUDING LIABILITY OR WARRANTIES RELATING TO FITNESS FOR A PARTICULAR PURPOSE, MERCHANTABILITY, OR INFRINGEMENT OF ANY PATENT, COPYRIGHT OR OTHER INTELLECTUAL PROPERTY RIGHT.
UNLESS OTHERWISE AGREED IN WRITING BY INTEL, THE INTEL PRODUCTS ARE NOT DESIGNED NOR INTENDED FOR ANY APPLICATION IN WHICH THE FAILURE OF THE INTEL PRODUCT COULD CREATE A SITUATION WHERE PERSONAL INJURY OR DEATH MAY OCCUR.
Intel may make changes to specifications and product descriptions at any time, without notice. Designers must not rely on the absence or characteristics of any features or instructions marked "reserved" or "undefined." Intel reserves these for future definition and shall have no responsibility whatsoever for conflicts or incompatibilities arising from future changes to them. The information here is subject to change without notice. Do not finalize a design with this information.
The products described in this document may contain design defects
or errors known as errata which may cause the product to deviate from published
specifications. Current characterized errata are available on request.
Contact your local Intel sales office or your distributor to obtain the latest
specifications and before placing your product order.
Copies of documents which have an order number and are referenced in this document, or other Intel literature, may be obtained by calling 1-800-548-4725, or by visiting Intel's Web Site.
Intel processor numbers are not a measure of performance. Processor numbers differentiate features within each processor family, not across different processor families. See http://www.intel.com/products/processor_number for details.
MPEG is an international standard for video compression/decompression promoted by ISO. Implementations of MPEG CODECs, or MPEG enabled platforms may require licenses from various entities, including Intel Corporation.
The software described in this document may contain software defects which may cause the product to deviate from published specifications. Current characterized software defects are available on request.
This document as well as the software described in it is furnished under license and may only be used or copied in accordance with the terms of the license. The information in this manual is furnished for informational use only, is subject to change without notice, and should not be construed as a commitment by Intel Corporation. Intel Corporation assumes no responsibility or liability for any errors or inaccuracies that may appear in this document or any software that may be provided in association with this document.
Except as permitted by such license, no part of this document may be reproduced, stored in a retrieval system, or transmitted in any form or by any means without the express written consent of Intel Corporation.
Developers must not rely on the absence or characteristics of any features or instructions marked "reserved" or "undefined." Improper use of reserved or undefined features or instructions may cause unpredictable behavior or failure in developer’s software code when running on an Intel processor. Intel reserves these features or instructions for future definition and shall have no responsibility whatsoever for conflicts or incompatibilities arising from their unauthorized use.
BunnyPeople, Celeron, Celeron Inside, Centrino, Centrino Atom, Centrino Atom Inside, Centrino Inside, Centrino logo, Core Inside, FlashFile, i960, InstantIP, Intel, Intel logo, Intel386, Intel486, IntelDX2, IntelDX4, IntelSX2, Intel Atom, Intel Atom Inside, Intel Core, Intel Inside, Intel Inside logo, Intel. Leap ahead., Intel. Leap ahead. logo, Intel NetBurst, Intel NetMerge, Intel NetStructure, Intel SingleDriver, Intel SpeedStep, Intel StrataFlash, Intel Viiv, Intel vPro, Intel XScale, Itanium, Itanium Inside, MCS, MMX, Oplus, OverDrive, PDCharm, Pentium, Pentium Inside, skoool, Sound Mark, The Journey Inside, Viiv Inside, vPro Inside, VTune, Xeon, and Xeon Inside are trademarks of Intel Corporation in the U.S. and other countries.
* Other names and brands may be claimed as the property of others.
Copyright © 2007-2010, Intel Corporation. All rights reserved.
The Intel® Cluster Toolkit Compiler Edition installation process on Linux* OS is comprised of eight basic steps. The Intel Cluster Toolkit Compiler Edition 4.0 package consists of the following components:
|
Software Component |
Default Installation Directory on IA-32 Architecture for Linux |
Default Installation Directory on Intel® 64 Architecture for Linux |
|
Intel® C++ Compiler 11.1 Update 6 |
/opt/intel/ictce/4.0.0.0xx/cc |
/opt/intel/ictce/4.0.0.0xx/cc/bin/ia32
/opt/intel/ictce/4.0.0.0xx/cc/bin/intel64 |
|
Intel® Debugger 11.1 Update 6 |
/opt/intel/ictce/4.0.0.0xx/idb
|
/opt/intel/ictce/4.0.0.0xx/idb/bin/ia32
/opt/intel/ictce/4.0.0.0xx/idb/bin/intel64 |
|
Intel® Fortran Compiler 11.1 Update 6 |
/opt/intel/ictce/4.0.0.0xx/fc
|
/opt/intel/ictce/4.0.0.0xx/fc/bin/ia32
/opt/intel/ictce/4.0.0.0xx/fc/bin/intel64 |
|
Intel® MPI Benchmarks 3.2.1 |
/opt/intel/ictce/4.0.0.0xx/imb |
/opt/intel/ictce/4.0.0.0xx/imb |
|
Intel® MPI Library 4.0 |
/opt/intel/ictce/4.0.0.0xx/impi |
/opt/intel/ictce/4.0.0.0xx/impi |
|
Intel® Math Kernel Library (MKL) 10.2 Update 5 |
/opt/intel/ictce/4.0.0.0xx/mkl |
/opt/intel/ictce/4.0.0.0xx/mkl |
|
Intel® Trace Analyzer and Collector 8.0 |
/opt/intel/ictce/4.0.0.0xx/itac |
/opt/intel/ictce/4.0.0.0xx/itac |
For the table above, references to 0xx in the directory path represents a build number such as 017. Note that the Intel Cluster Toolkit Compiler Edition installer will automatically make the appropriate selection of binaries, scripts, and text files from its installation archive based on the Intel processor architecture of the host system where the installation process is initiated. You do not have to worry about selecting the correct software component names for the given Intel architecture.
Recall that you as a user of the Intel Cluster Toolkit Compiler Edition on Linux may need assistance from your system administrator in installing the associated software packages on your cluster system, if the installation directory requires system administrative write privileges (e.g. /opt/intel on Linux). This assumes that your login account does not have administrative capabilities.
2.1 Linux* OS Installation
To begin installation on Linux*:
1. For Linux systems, a machines.LINUX file will either need to be created, or an existing machines.LINUX file can be used by the Intel Cluster Toolkit Compiler Edition installer to deploy the appropriate software packages from the toolkit amongst the nodes of the cluster. This machines.LINUX file contains a list of the computing nodes (i.e. the hostnames) for the cluster. The format is one hostname per line:
hostname
The hostname should be the same as the result from the Linux command “hostname”. An example of the content for the file machines.LINUX, where a contrived cluster consists of eight nodes might be:
clusternode1
clusternode2
clusternode3
clusternode4
clusternode5
clusternode6
clusternode7
clusternode8
A line of text above is consider a comment line if column 1 contains the “#” symbol. It is always assumed that the first node in the list is the master node. The remaining nodes are the compute nodes. The text clusternode1 and clusternode2, for example, represent the names of two of the nodes in a contrived computing cluster. The contents of the machines.LINUX file can also be used by you to construct an mpd.hosts file for the multi-purpose daemon (MPD) protocol. The MPD protocol is used for running MPI applications that utilize Intel MPI Library.
2. In preparation for doing the installation, you may want to create a staging area. On the system where the Intel Cluster Toolkit Compiler Edition software components are to be installed, it is recommended that a staging area be constructed in a directory such as /tmp. An example folder path staging area might be:
/tmp/ict_staging_area
where ict_staging_area is an acronym for Intel Cluster Toolkit Compiler Edition staging area.
3. Upon registering for Intel Cluster Toolkit Compiler Edition 4.0, you will receive a serial number (e.g., C111-12345678) for this product. Your serial number can be found within the email receipt of your product purchase. Go to the Intel® Software Development Products Registration Center site and provide the product serial number information. Once admission has been granted into the registration center, you will be able to access the Intel® Premier Web pages for software support.
4. The license for the Intel Cluster Toolkit Compiler Edition license file that is provided to you should be placed in a directory pointed to by the INTEL_LICENSE_FILE environment variable. Do not change the file name as the ".lic" extension is critical. Common locations for the attached license file are:
<installation path>/licenses
where licenses is a sub-directory. For example, on the cluster system where the Intel Cluster Toolkit Compiler Edition software is to be installed, all licenses for Intel-based software products might be placed in:
/opt/intel/licenses
It is also imperative that you and/or the system administrator set the environment variable INTEL_LICENSE_FILE to the directory path where the Intel software licenses will reside prior to doing an installation of the Intel Cluster Toolkit Compiler Edition. For Bourne* Shell or Korn* Shell the syntax for setting the INTEL_LICENSE_FILE environment variable might be:
export INTEL_LICENSE_FILE=/opt/intel/licenses
For C Shell, the syntax might be:
setenv INTEL_LICENSE_FILE /opt/intel/licenses
Also, for using Cluster OpenMP* on Linux for Intel® 64 architecture, go to the URL:
and click on the web-link for the Cluster OpenMP license. Cluster OpenMP is an unsupported software product and may be used by customers through a prerelease End User License Agreement (EULA). Place this license in the directory:
/opt/intel/licenses
on your cluster system. This free license will allow you to use the Cluster OpenMP library.
5. Patrons can place the Intel Cluster Toolkit Compiler Edition software package into the staging area folder.
6. The installer package for the Intel Cluster Toolkit Compiler Edition has the following general nomenclature:
l_ict_<major>.<minor>.<update>.<package_num>.tar.gz
where <major>.<minor>.<update>.<package_num> is a string such as:
b_4.0.0.xxx, where b is an acronym for beta
or
p_4.0.0.xxx, where p is an acronym for production
The <package_num> meta-symbol is a string such as 017. This string indicates the package number.
The command:
tar –xvzf l_ict_<major>.<minor>.<update>.<package_num>.tar.gz
will create a sub-directory called l_ict_<major>.<minor>.<update>.<package_num>. Change to that directory with the shell command:
cd l_ict_<major>.<minor>.<update>.<package_num>
For example, suppose the installation package is called l_ict_p_4.0.0.017.tar.gz. In the staging area that has been created, type the command:
tar –xvzf l_ict_p_4.0.0.017.tar.gz
This will create a sub-directory called l_ictce_p_4.0.0.017. Change to that directory with the shell command:
cd l_ict_p_4.0.0.017
In that folder make sure that machines.LINUX file, as mentioned in item 1 above, is either in this directory or you should know the directory path to this file.
7. Also within the l_ict_<version>.<release> directory staging area, the expect shell script file called “sshconnectivity.exp” can be used to help you establish secure shell connectivity on a cluster system, where expect is a tool for automating interactive applications. To run “sshconnectivity.exp”, the expect runtime software needs to be installed on your Linux system. To make sure that the expect runtime software is properly installed, type:
which expect
If you encounter a “Command not found.” error message, you can download the expect software package from the following URL:
The syntax for the “sshconnectivity.exp” command is:
./sshconnectivity.exp machines.LINUX
This expect shell script will create or update a ~/.ssh directory on each node of the cluster beginning with the master node which must be the first name listed in the machines.LINUX file. This script will prompt you for your password twice.
Enter your user password:
Re-enter your user password:
To provide security each time you enter your user password, asterisks will appear in lieu of the password text. Upon successful completion of the script, the following message fragment will appear:
…
*********************************************************************
Node count = 4
Secure shell connectivity was established on all nodes.
…
*********************************************************************
…
A log of the transactions for this script will be recorded in:
/tmp/sshconnectivity.<login-name>.log
where <login-name> is a meta-symbol for your actual login.
Note that the expect shell script sshconnectivity.exp will remove the write access capability on the group and other “permission categories” for the user’s home directory folder. If this is not done, a password prompt will continue to be issued for any secure shell activity.
This process of establishing secure shell connectivity in step 7 above is demonstrated by the following complete graph[1] (Figure 2.1) illustration where a vertex in the graph represents a cluster computing node, and an edge between two vertices connotes that the two cluster computing nodes have exchanged public keys for secure shell connectivity. Secure shell connectivity is intended to provide secure, encrypted communication channels between two or more cluster nodes over an insecure network.
The script sshconnectivity.exp will call the appropriate secure shell utilities to generate a private key and a public key for each node of the cluster.
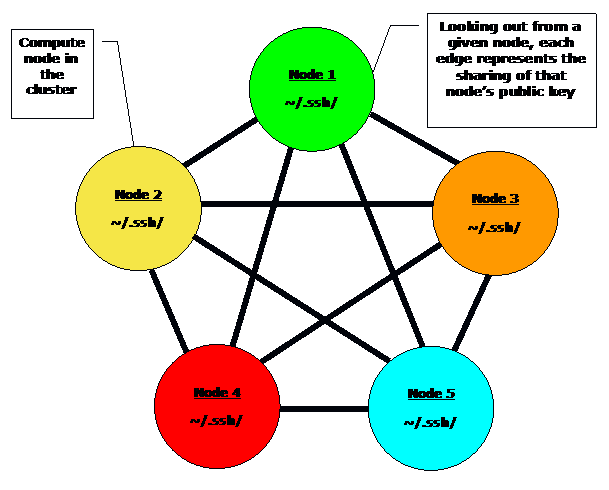
Figure 2.1 – Illustration of Secure Shell Connectivity for a Computing Cluster
For the complete graph example in Figure 2.1, suppose there are nodes (vertices) 1 to n in the cluster. For a given node i, nodes 1 to i – 1 and nodes i + 1 to n are provided with the public key from node i. The user’s public keys for a given node will be stored in the ~/.ssh folder associated with the user’s home directory for that computing node. Since there are n – 1 edges to a given node i in Figure 2.1, that node i will have n – 1 public keys in the ~/.ssh folder that were provided by the other n – 1 nodes in the cluster. The example in Figure 2.1 represents a computing cluster that has at total of 5 nodes. The edges connecting a node indicate that that node has received 4 public keys from the remaining computing nodes. Also looking out from a given node indicates that the given node has provided its own public key to the remaining nodes that are reachable via the 4 edge paths.
If the home directory for a cluster is shared by all of the nodes of the cluster, i.e., all of the nodes use the same ~/.ssh folder, the connectivity illustrated in Figure 2.1 is represented through the contents of the ~/.ssh/known_hosts file.
8. Once secure shell connectivity is established, type a variation of the install.sh as illustrated in Figure 2.2.
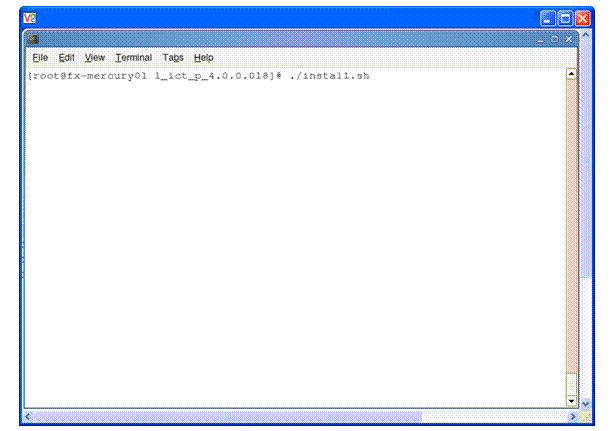
Figure 2.2 – Initiating the installation process with the command install.sh
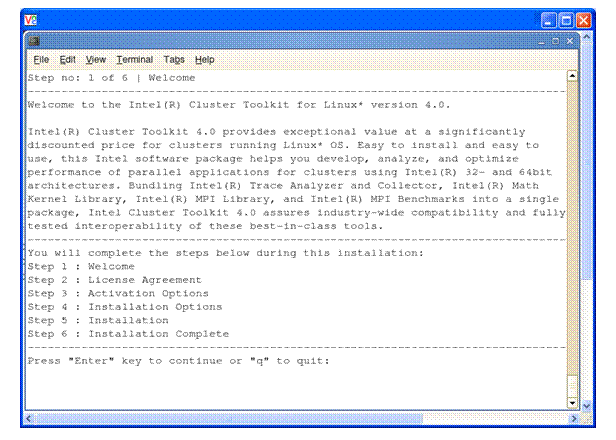
Figure 2.3 – The six steps in the installation process
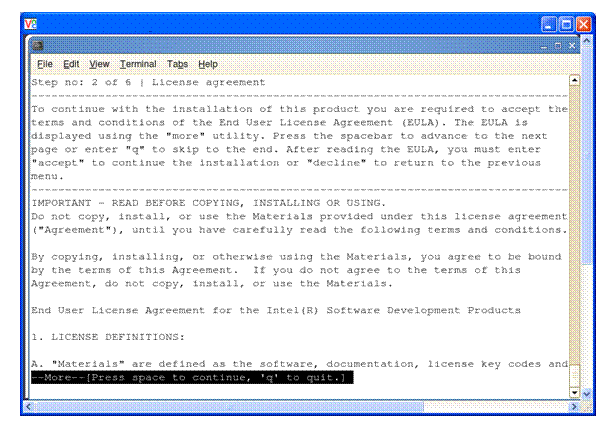
Figure 2.4 – License agreement
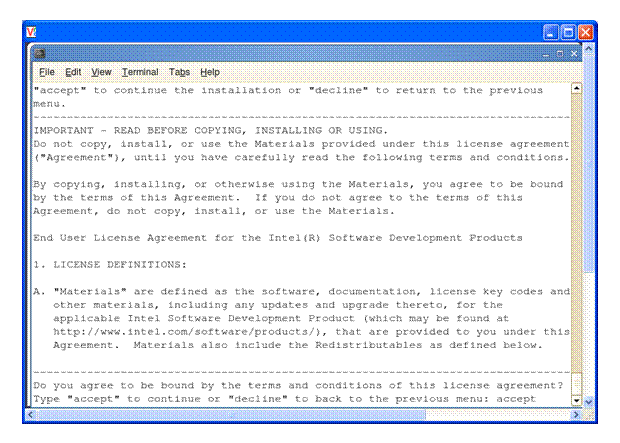
Figure 2.5 – Enter the accept word to acknowledge the terms of the license agreement
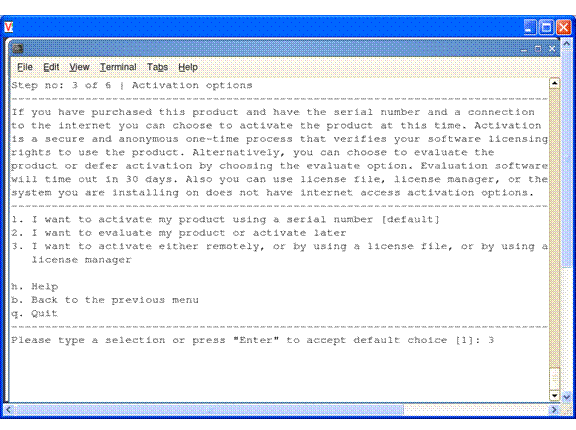
Figure 2.6 – Step 3 – Select option 3 where you want to provide a license file to complete the installation process
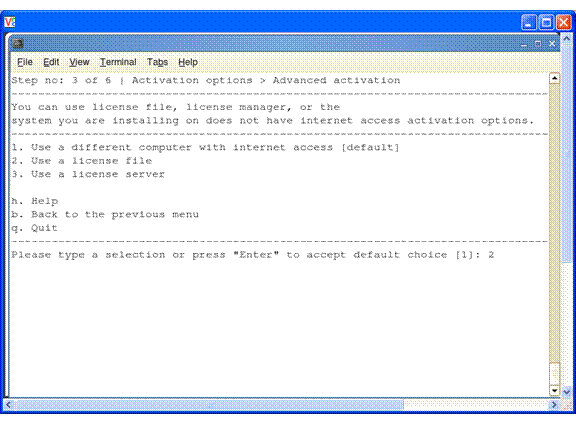
Figure 2.7 - Step 3 Continued – Selection option 2 to direct the installer to ask for a license file
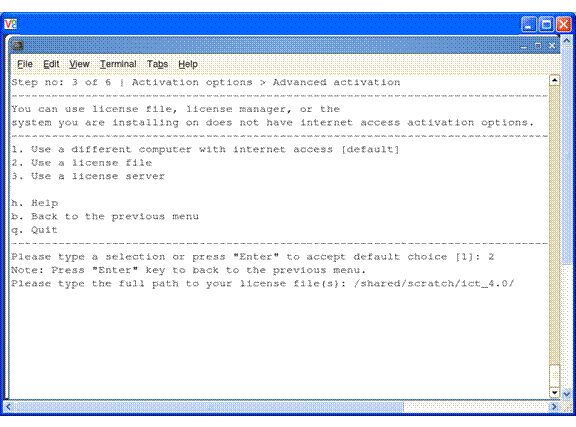
Figure 2.8 – Step 3 Continued – Provide a directory path to where the license file resides
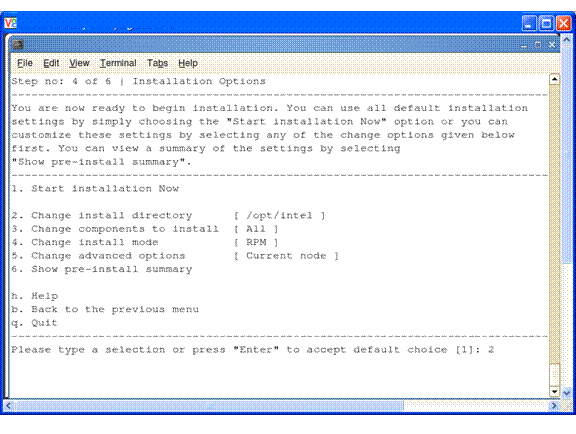
Figure 2.9 – Step 4 – Select option 2 in order to change the install directory from the default which is /opt/intel
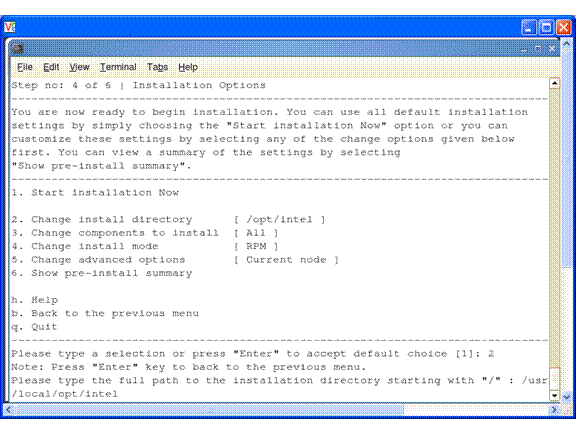
Figure 2.10 - Step 4 Continued – Provide the alternative directory path
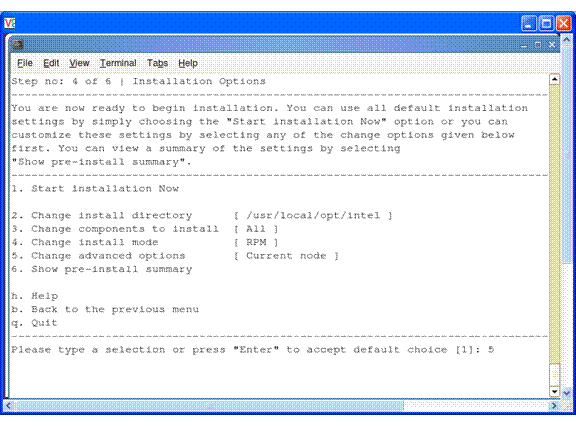
Figure 2.11 – Step 4 Continued – Select option 5 so as to do a distributed install as opposed to installing only on the current (I.e., the master) node
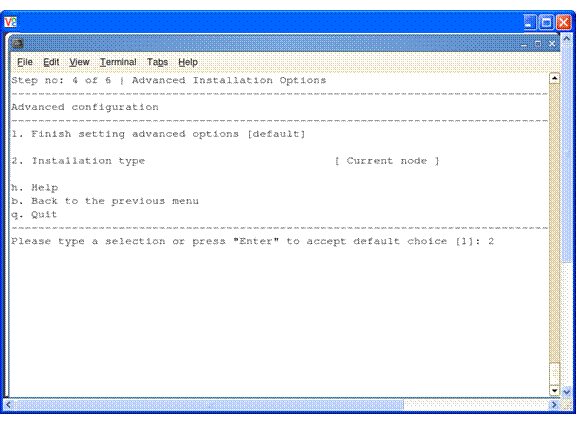
Figure 2.12 – Step 4 Continued – Select option 2 to continue the process of doing a distributed install
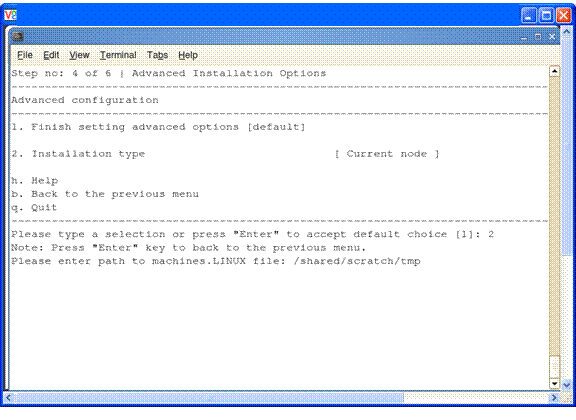
Figure 2.13 – Step 4 Continued – Provide a directory path to a file that contains a list of the nodes for the cluster
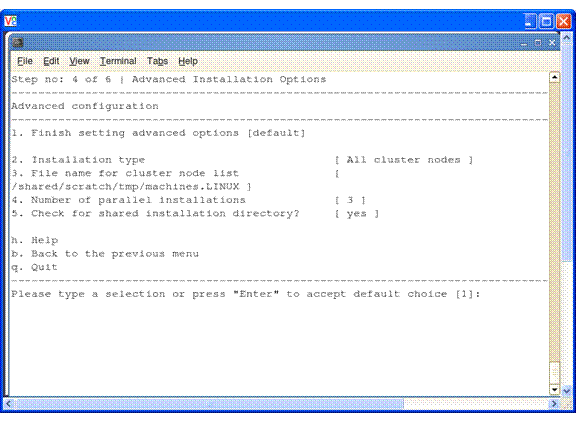
Figure 2.14 – Step 4 Continued – Select the default option of 1 as an indication that all advanced configuration options have been exercised
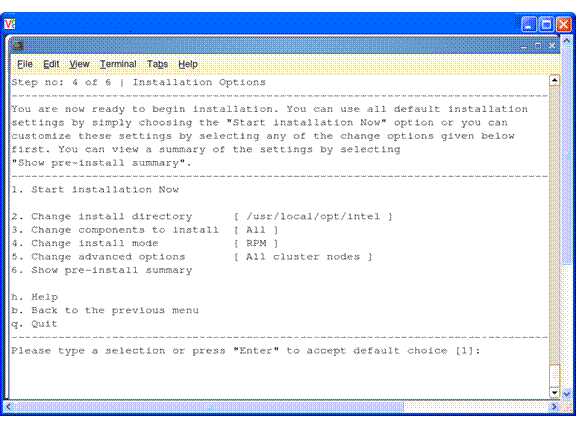
Figure 2.15 – Step 4 Continued – Select the default option of 1 as an indication that all installation options have been exercised
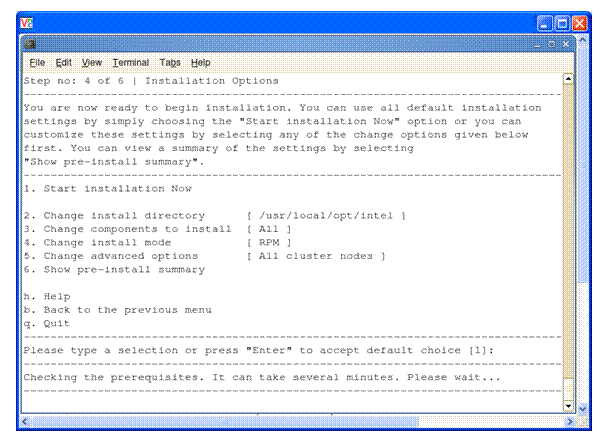
Figure 2.16 – Step 4 Continued – Let the install process proceed
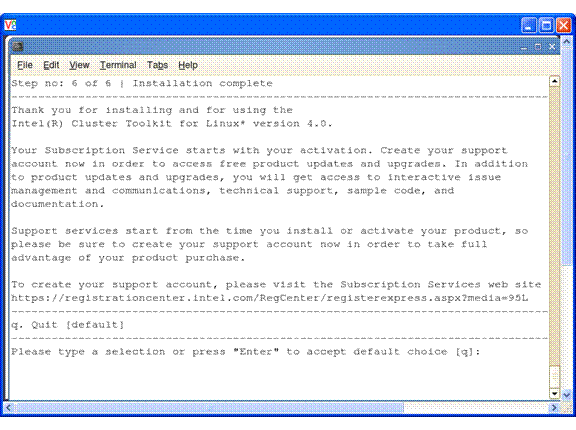
Figure 2.17 - Step 6 – The install process has completed and press the enter key to close the installer session
By default, the global root directory for the installation of the Intel Cluster Toolkit Compiler Edition is:
/opt/intel/ictce/<major>.<minor>.<update>.<package_num>
where <major>, <minor>, <update>, and <package_num> are integers. An example would be 4.0.0.017.
Within the folder path /opt/intel/ictce/<major>.<minor>.<update>.<package_num> you will find the text files:
ictvars.csh
ictvars.sh
and
ictcesupport.txt
If you are using Bourne Shell or Korn Shell for the login session, you should type:
. ./ictvars.sh
and for a login session that uses C Shell, you should type:
source ./ictvars.csh
The file called:
ictcesupport.txt
contains the Package ID and Package Contents information. Please use the information in ictcesupport.txt when submitting customer support requests.
For the default installation path, an index file, an FAQ file, and the Getting Started Guide are located in the directory path:
/opt/intel/ictce/<major>.<minor>.<update>.<package_num>/doc
where as mentioned above, <major>, <minor>, <update>, and <package_num> are integers. A complete default folder path to the documentation directory might be:
/opt/intel/ictce/4.0.0.017/doc
The name of the index file is:
Doc_Index.htm
The index file can be used to navigate to the FAQ, the release notes, the Getting Started Guide, and an internet accessible Intel Cluster Toolkit Compiler Edition Tutorial. This web-based tutorial may have information within it that is more recent than that of the Getting Started Guide. Note that for Beta programs involving the Intel Cluster Toolkit Compiler Edition, there is no web based tutorial.
The index file will also provide links to Intel C++ Compiler documentation, Intel Debugger Documentation, Intel Fortran Compiler documentation, Intel Trace Analyzer and Collector documentation, Intel MPI Library documentation, Intel MKL documentation, and Intel MPI Benchmarks documentation. The content of the index file will look something like the following (Figure 2.18):
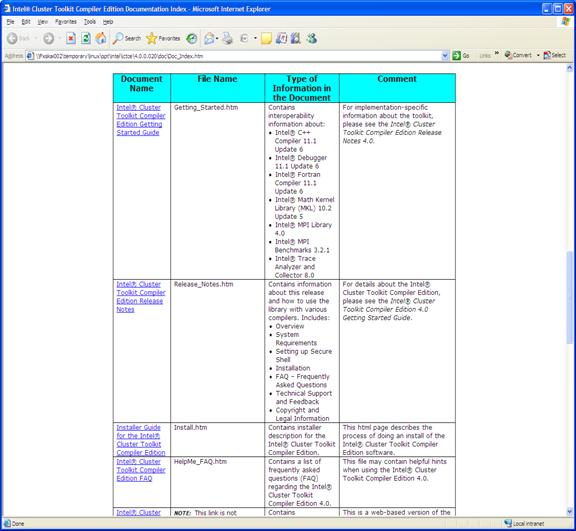
Figure 2.18 – A Rendering of the Intel Cluster Toolkit Compiler Edition Documentation Index File display
The name of the FAQ file is:
HelpMe_FAQ.htm
The name of the Getting Started Guide file is:
Getting_Started.htm
By default, the local version of the release notes is located in the directory path:
/opt/intel/ictce/<major>.<minor>.<update>.<package_num>/release_notes
The name of the release notes file is:
Release_Notes.htm
For Linux, if you wish to uninstall the Intel Cluster Toolkit Compiler Edition, there is a shell script called uninstall.sh. This script can be found in folder path:
<Path-to-Intel-Cluster-Toolkit-Compiler-Edition>/uninstall.sh
An example folder might be:
/usr/local/opt/intel/ictce/4.0.0.017/uninstall.sh
When this uninstall script is invoked, it will prompt you for that location of the machines.LINUX file.
The uninstall script does have command-line options. Simply type a shell command referencing uninstall.sh such as:
uninstall.sh --help | less
and you will see a list of options that look something like:
NAME
uninstall.sh - Uninstall Intel(R) Cluster Toolkit Compiler Edition for Linux* 4.0.
SYNOPSIS
uninstall.sh [options]
Copyright(C) 1999-2010, Intel Corporation. All Rights Reserved.
Processor System Requirements
Intel® Pentium® 4 processor, or
Intel® Xeon® processor, or
Intel® Core™2 Duo processor (example of Intel 64 (formerly Intel EM64T) architecture)
Note: It is assumed that the processors listed above are configured into homogeneous clusters.
Disk-Space Requirements
20 GBs of disk space (minimum)
Note: During the installation process the installer may need approximately 4 gigabytes of temporary disk storage to manage the intermediate installation files.
Operating System Requirements for Linux* OS
|
OS Distributions |
IA-32 Architecture |
Intel® 64 Architecture |
|
|
32-Bit Applications |
64-Bit Applications |
||
|
Red Hat Enterprise Linux* 4.0 |
S |
S |
S |
|
Red Hat Enterprise Linux* 5.0 |
S |
S |
S |
|
SUSE Linux Enterprise Server* 10 |
S |
S |
S |
|
SUSE Linux Enterprise Server* 11 |
S |
S |
S |
S = Supported
Memory Requirements
2 GB of RAM (minimum)
Intel license keys should be place in a common repository for access by the software components of the Intel Cluster Toolkit Compiler Edition. An example license directory path might be:
/opt/intel/licenses
1. The Intel® IDB Debugger graphical environment is a Java* application and requires a Java Runtime Environment* (JRE*) to execute. The debugger will run with a version 5.0 (also called 1.5) JRE.
Install the JRE according to the JRE provider's instructions.
Finally you need to export the path to the JRE as follows:
export PATH=<path_to_JRE_bin_DIR>:$PATH export
2. Configure the environment variables. For the ~/.bashrc file, an example of setting environment variables and sourcing shell scripts might be the following for Intel® 64 architecture:
export INTEL_LICENSE_FILE=/opt/intel/licenses
. /opt/intel/ictce/4.0.0.017/ictvars.sh
Alternatively, for ~/.cshrc the syntax might be something like:
setenv INTEL_LICENSE_FILE /opt/intel/licenses
source /opt/intel/ictce/4.0.0.017/ictvars.csh
3. For Bourne* Shell on Linux*, once the Intel® Cluster Toolkit Compiler Edition environment variables referenced within “ictvars.sh” file have been sourced via a .bashrc file, users for a given Bourne* Shell login session can simply type:
. ictvars.sh ia32
for creating IA-32 executables. Alternatively, to restore the default Intel® Cluster Toolkit environment variable settings so as to build executables with Intel® 64 address extensions, simply type:
. ictvars.sh
within the Bourne* Shell login session.
Note that the full path to ictvars.sh can be omitted once it has been sourced in the .bashrc file.
For a C Shell login session on Linux*, IA-32 executables can be created with a login session command such as:
source /opt/intel/ict/4.0.0.035/ictvars.csh ia32
Within a C Shell login session, to restore the default Intel® Cluster Toolkit Compiler Edition environment variable settings so as to build executables with Intel® 64 address extensions, simply type:
source /opt/intel/ict/4.0.0.035/ictvars.csh
4. When using the Intel Debugger (IDB) with Intel MPI Library, you also want to create or update the ~/.rhosts file with the names of the nodes of the cluster. The ~/.rhosts file should have node names that use the following general syntax:
<hostname as echoed by the shell command hostname> <your username>
The permission bit settings of ~/.rhosts should be set to 600 using the chmod command. The shell command for doing this might be:
chmod 600 ~/.rhosts